Gleaning and Presenting

I’ve been back on the presenter circuit these past few weeks and it honestly feels really good. Presenting in the Age of The Vid is peculiar and requires a change up in skills. Voicing over a slide deck really doesn’t work anymore. Having your face in the corner of the Skype or Zoom helps. A bit of face presence and a lot of videos works the best because it provides something visually interesting to hold the audience’s attention while providing the realtime authenticity (and the potential for hockey-fight level disasters) that makes live theater worthwhile.

My colleague Charles De Andrade and I did two talks at the beginning of the month at MEP Force 2020, a conference of digital tech in the construction industry. We did a case study talk on how the use of 3D visualizations on the desktop as well as in Mixed Reality improves planning and reduces cost, especially in a situation where we increasingly need to be able to work remotely. The second talk went into the details of the challenges involved in getting very large buildings into very small visualization devices and how we work around these with lots of math.

thegleaners

Then this past weekend I did a talk at XReality organized by Dom Wu called Dreaming in Holograms about my work in spatial computing and my hobby ‘gleaning’ sci fi scenes and screen scrapes from movie and television.

image

To glean, according to Webster’s, is to gather grain after the reapers have finished harvesting. Besides grain, you can also glean potatoes, grapes, vegetables, figs – pretty much anything that is left behind after the normal harvesting process. And I glean sci fi.

image

So I spent 90 minutes discussing my gleaning hobby and how it relates to my profession – building Holographic applications.

image

And of course how both of these have left me with a strange condition. I dream in holograms. My dreams are filled with semi-transparent buildings and semi-transparent people. This is true of my falling dreams as well as my swimming through air dreams. It’s even true of my being late to class and naked dreams. Oddly, though, all my nocturnal holograms are monochromatic, filled in with many shades of gray, and never in full color.

image

I’ve heard of a man in Japan who dreams in fish – which I find difficult to imagine.

Windows Insider Builds and Unity Licenses

On one of my dev PCs, I’m on the Windows 10 Insider Builds inner ring, which updates my computer with intermediate builds of Windows. This gives me access to the latest features for testing. Unfortunately, it also means that my Unity Plus license goes into an inconsistent state every few weeks after an Insider Build changes my computer profile enough that Unity no longer recognizes it as the same computer.

maximum

In the past I’ve tied going into my account management and try to revoke the assigned seat and then assign it again to myself. Sometimes this works but often it doesn’t. Somehow during the Windows update process, something happens with the original license that it cannot be disabled correctly.


my_seats

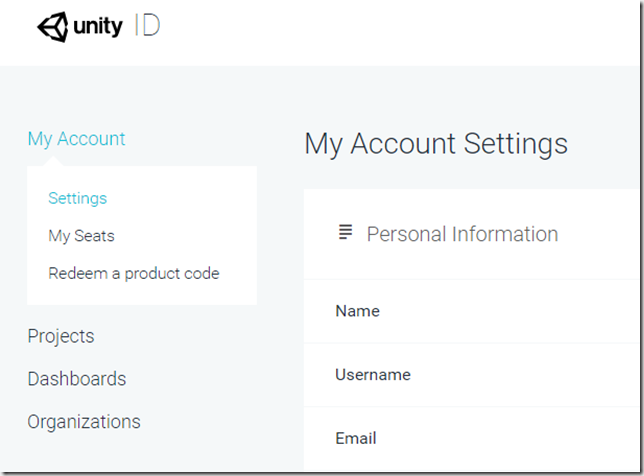
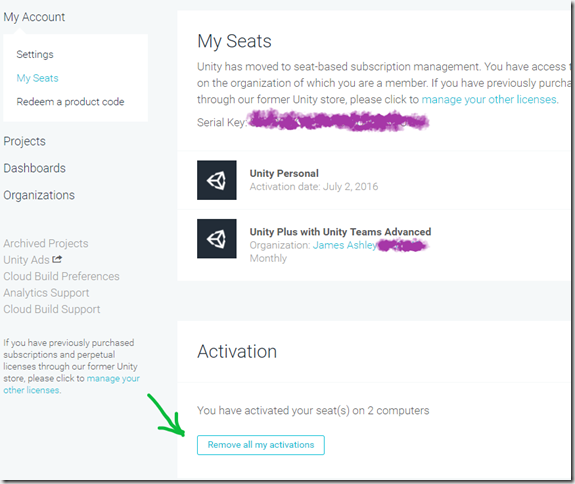
I recently found out that there is a different route to deactivating seats that will work even after a Windows 10 update. Back in the account landing page, you need to navigate to My Seats instead of going through the Organizations menu.

remove_activations


This leads you to a page that lets you remove all license activations. Once you’ve clicked on “Remove all my activations”, you can then successfully use your license key to reactivate your Unity IDE.

Atlanta .NET User Group

I will be presenting on “Working with new ASP.NET features in .NET Framework 3.5 Service Pack 1” at the Atlanta .NET User Group on Monday, October 27th.  Magenic will be providing refreshments, as usual.   The meeting will begin at 6:00 PM at Microsoft’s Offices in Alpharetta.  It’s a lot of material to pack into an hour long presentation, but I think I have a few good strategies for working with that.  The presentation will cover Dynamic Data, Entity Framework, Data Services, the Silverlight Media Control, the Ajax browser history feature built into the Script Manager, and Script Combining.  That gives me about 10 minutes per technology.  Whew.

Microsoft Corporation
1125 Sanctuary Pkwy.
Suite 300
Atlanta, GA 30004

Directions to Microsoft

Styling the Validator Callout Extender

The Validator Callout Extender is one of the controls included in the Ajax Control Toolkit.  It allows one to replace the normal appearance of an asp.net validation control with an attractive cutout.  For instance:

This is a required field.

A common problem concerns how to restyle the callout to give it a custom appearance.  The documentation for this control makes it clear that the default CSS class may be overridden in order to change the appearance of the callout. The Callout Extender has a CssClass property which may be set to a custom style.  Unfortunately, the documentation also includes an apparent error.  According to the documentation for the Validation Callout Extender:

If your CssClass does not provide values for any of those then it falls back to the default value.

This turns out not to be true.  Instead, one must override all the nested classes of the Callout Extender in order to get a reasonably good looking callout.  If any of the nested classes are not overridden, once a value has been assigned to the CssClass property, no style is applied to the nested style.

Consequently, in order to do something as simple as setting the back-color of the callout to Blue, the custom style will end up looking like this:

    <style type="text/css">
        .customCalloutStyle div, .customCalloutStyle td
        {
            border: solid 1px Black;
            background-color: Blue;
        }
        .customCalloutStyle .ajax__validatorcallout_popup_table
        {
            display: none;
            border: none;
            background-color: transparent;
            padding: 0px;
        }
        .customCalloutStyle .ajax__validatorcallout_popup_table_row
        {
            vertical-align: top;
            height: 100%;
            background-color: transparent;
            padding: 0px;
        }
        .customCalloutStyle .ajax__validatorcallout_callout_cell
        {
            width: 20px;
            height: 100%;
            text-align: right;
            vertical-align: top;
            border: none;
            background-color: transparent;
            padding: 0px;
        }
        .customCalloutStyle .ajax__validatorcallout_callout_table
        {
            height: 100%;
            border: none;
            background-color: transparent;
            padding: 0px;
        }
        .customCalloutStyle .ajax__validatorcallout_callout_table_row
        {
            background-color: transparent;
            padding: 0px;
        }
        .customCalloutStyle .ajax__validatorcallout_callout_arrow_cell
        {
            padding: 8px 0px 0px 0px;
            text-align: right;
            vertical-align: top;
            font-size: 1px;
            border: none;
            background-color: transparent;
        }
        .customCalloutStyle .ajax__validatorcallout_callout_arrow_cell .ajax__validatorcallout_innerdiv
        {
            font-size: 1px;
            position: relative;
            left: 1px;
            border-bottom: none;
            border-right: none;
            border-left: none;
            width: 15px;
            background-color: transparent;
            padding: 0px;
        }
        .customCalloutStyle .ajax__validatorcallout_callout_arrow_cell .ajax__validatorcallout_innerdiv div
        {
            height: 1px;
            overflow: hidden;
            border-top: none;
            border-bottom: none;
            border-right: none;
            padding: 0px;
            margin-left: auto;
        }
        .customCalloutStyle .ajax__validatorcallout_error_message_cell
        {
            font-family: Verdana;
            font-size: 10px;
            padding: 5px;
            border-right: none;
            border-left: none;
            width: 100%;
        }
        .customCalloutStyle .ajax__validatorcallout_icon_cell
        {
            width: 20px;
            padding: 5px;
            border-right: none;
        }
        .customCalloutStyle .ajax__validatorcallout_close_button_cell
        {
            vertical-align: top;
            padding: 0px;
            text-align: right;
            border-left: none;
        }
        .customCalloutStyle .ajax__validatorcallout_close_button_cell .ajax__validatorcallout_innerdiv
        {
            border: none;
            text-align: center;
            width: 10px;
            padding: 2px;
            cursor: pointer;
        }
    </style>

This will give you the following change in appearance:

This is a required field.

In order to play with the nested classes in order to customize the look of the callout, it would be useful to know what the HTML for the Validator Callout actually looks like.  Unfortunately, the callout is generated using client script, making it impossible to simply peek at the source in order to figure out what the markup looks like.  After about an hour of reading through the behavior class for the Callout Extender, I was finally able to come up with this:

        <table id="_popupTable" cellpadding="0" cellspacing="0" border="0" class="customCalloutStyle">
            <tbody>
                <tr class="ajax__validatorcallout_popup_table_row">
                    <td class="ajax__validatorcallout_callout_cell">
                        <table width="200px" cellpadding="0" cellspacing="0" border="0" 
                            class="ajax__validatorcallout_callout_table">
                            <tbody>
                                <tr class="ajax__validatorcallout_callout_table_row">
                                    <td class="ajax__validatorcallout_callout_arrow_cell">
                                        <div class="ajax__validatorcallout_innerdiv">
                                            <div style="width: 14px">
                                            </div>
                                            <div style="width: 13px">
                                            </div>
                                            <div style="width: 12px">
                                            </div>
                                            <div style="width: 11px">
                                            </div>
                                            <div style="width: 10px">
                                            </div>
                                            <div style="width: 9px">
                                            </div>
                                            <div style="width: 8px">
                                            </div>
                                            <div style="width: 7px">
                                            </div>
                                            <div style="width: 6px">
                                            </div>
                                            <div style="width: 5px">
                                            </div>
                                            <div style="width: 4px">
                                            </div>
                                            <div style="width: 3px">
                                            </div>
                                            <div style="width: 2px">
                                            </div>
                                            <div style="width: 1px">
                                            </div>
                                        </div>
                                    </td>
                                    <td class="ajax__validatorcallout_icon_cell">
                                        <img alt="" border="0" src="alert-large.gif" />
                                    </td>
                                    <td class="ajax__validatorcallout_error_message_cell">
                                        This is a required field.
                                    </td>
                                    <td class="ajax__validatorcallout_close_button_cell">
                                        <div class="ajax__validatorcallout_innerdiv">
                                            <img alt="" border="0" src="close.gif" />
                                        </div>
                                    </td>
                                </tr>
                            </tbody>
                        </table>
                    </td>
                </tr>
            </tbody>
        </table>
 

This probably isn’t completely correct, but it’s pretty close.  If you want to try to write your own custom style for the Validator Callout Extender, just copy the markup above, as well as the CSS class above that, into your favorite WYSIWYG editor and have at it.  At a minimum, you should be able to customize the colors either to match your site design (the default background color is Chiffon Yellow, after all), or to indicate different sorts of validation errors.

One question I’ve seen on the ASP.NET Forums concerns whether it is possible to switch the arrow that flies off the left side of the callout to the right.  Unfortunately, the arrow is actually coded into the HTML generated by the Validator Callout, and is not controlled by CSS styles.  It would be nice to see this as a feature of future releases of the Ajax Control Toolkit.

ASP.NET AJAX: Script Globalization without the ScriptManager

bigfoot

I just spent about four hours trying to solve a problem I’ll probably never actually encounter in the wild.  Someone posted on the asp.net forums about script globalization using ASP.NET AJAX.  This can be set up pretty easily by simply using the ScriptManager control and setting its EnableScriptGlobalization property to true.  ScriptManager takes care of importing the necessary scripts and handling all the underlying code required to make things work.

What the seeker on the forums wanted to know, however, was whether this could be accomplished without the ScriptManager.  In theory, all the ASP.NET AJAX framework scripts can be downloaded and used in a non-platform dependent manner.

Certain software problems are ubiquitous, and people tend to fall over themselves blogging and posting about them until Microsoft or some other vendor eventually either fixes the problem and it goes away.  On the other hand, there are problems in the software bestiary that are so rare that working on them is the programming equivalent of doing cryptozoology.

This was a juicy problem of that sort.  And I believe I have a solution. It basically involves redoing some of what the ScriptManager does automatically, but what the hey.

To support globalization in ecmascript, the ScriptManager basically sets a variable called __cultureInfo behind the scenes.  This is then used by various ASP.NET AJAX script methods to provide formatting information.  This is actually explained in the Microsoft documentation for the feature.

Behind the scenes, it seems clear, the ScriptManager is querying the CurrentUICulture of the current thread in order to determine the browser’s preferred language, and passing this to the __cultureInfo variable.  The trick, then, is to determine the format of the culture data passed to __cultureInfo.

Here I had to use reflection to discover that there is an internal ClientCultureInfo type in the Sys.Web.Extensions assembly.  It made sense that this was being serialized and passed to the __cultureInfo variable.  With some trial and error, I finally got the serialization correct.

To make this work, you will need to download the Ajax Framework Library, which is a collection of javascript files.  You will need to import the MicrosoftAjax.js file into your web project, and then reference it in your page, like this:

<script src=”MicrosoftAjax.js” type=”text/javascript”></script>

You will also need to create the ClientCultureInfo class for your project, and make sure that it is serializable.  I tried DataContractJsonSerializer class to do my serializing,  but had problem getting the DateTimeFormatInfo type to serialize correctly, so I finally opted to use the now obsolete JavaScriptSerializer.  Here’s what the class looks like:

    public class ClientCultureInfo

    {


        public string name;

        public DateTimeFormatInfo dateTimeFormat;

        public NumberFormatInfo numberFormat;


        public ClientCultureInfo(CultureInfo cultureInfo)

        {

            this.name = cultureInfo.Name;

            this.numberFormat = cultureInfo.NumberFormat;

            this.dateTimeFormat = cultureInfo.DateTimeFormat;

        }


        public static string SerializedCulture(ClientCultureInfo info)

        {

            JavaScriptSerializer js = new JavaScriptSerializer();

            return js.Serialize(info);


        }


    }

Now that we have the culture info formatted correctly, we need to be able to pass it to the client variable.  We’ll create a public property in the code-behind that is accessible from the client, and set its value in the Page.Load event handler:


        protected void Page_Load(object sender, EventArgs e)

        {

            if (!Page.IsPostBack)

            {

                CultureInfo cultureInfo = System.Threading.Thread.CurrentThread.CurrentUICulture;

                ClientCultureInfo o = new ClientCultureInfo(cultureInfo);

                SerializedCulture = ClientCultureInfo.SerializedCulture(o);

            }


        }


        public string SerializedCulture

        {

            set

            {

                ViewState[“kultur”] = value;

            }

            get

            {

                if (ViewState[“kultur”] == null)

                    return string.Empty;

                else

                    return ViewState[“kultur”].ToString();

            }

        }

Finally, we  need to use this code-behind property to set __cultureInfo.  Just add the following script block to your markup in order to set the current culture:


<script type="text/javascript">
    // Get the name field of the CurrentCulture object   
    var __cultureInfo = '<%= this.SerializedCulture %>';
    Sys.CultureInfo.CurrentCulture = Sys.CultureInfo._parse(__cultureInfo);
</script>


I added this to the bottom of the page.  To test whether this works, you will need to set the language property of your browser (if you are using IE, like I am).  I set mine to French for testing.  Then append the following script block below the one setting the culture above:

<script type="text/javascript">
    var currentCultureInfoObj = Sys.CultureInfo.CurrentCulture;
    var d = new Date();
    alert("Current culture is " + currentCultureInfoObj.name 
    + " and today is " 
    + d.localeFormat('dddd, dd MMMM yyyy HH:mm:ss'));  
</script> 


If you encounter any problems, it is possible that the web.config file is overriding the culture information from the browser.  In that case, make sure the culture is set to “auto” in the config file, like this:


    <system.web>

        <globalization uiCulture=auto culture=auto />

    </system.web>

Ajax AutoComplete Extender with WCF

blackstone

The problem with conjuring tricks is that they lose practically all their glamour once you find out how they are done.  It’s very cool to see David Blaine walk down the street, do a few passes over his hand, and resurrect a fly which proceeds to flee.  It’s rather disappointing to do a google search and discover that in order to prepare for this trick, the first requirement is that you freeze a fly.

My trick is to make an autocomplete extender from the Ajax Control Toolkit call a WCF service instead of an asmx service.  For this recipe, I assume that you are already familiar with the autocomplete extender, and that you are using Visual Studio 2008.  I warn you in advance — my trick disappoints.  It is so trivially easy that, once the technique spreads, it is very unlikely to impress your colleagues at work, much less get you a date with a supermodel.

Start by creating a new web project called AutocompleteWCF.  Add a reference to the AjaxControlToolkit.dll.  Open up the default aspx page that is generated with your project, and add the following code to:

    <form id="form1" runat="server">
    <asp:ScriptManager ID="ScriptManager1" runat="server">
    </asp:ScriptManager>
    <div>
            <asp:TextBox runat="server" ID="myTextBox" Width="300" autocomplete="off" />
            <ajaxToolkit:AutoCompleteExtender
                runat="server" 
                BehaviorID="AutoCompleteEx"
                ID="autoComplete1" 
                TargetControlID="myTextBox"
                ServicePath="Autocomplete.svc" 
                ServiceMethod="GetCompletionList"
                MinimumPrefixLength="0" 
                CompletionInterval="1000"
                EnableCaching="true">
            </ajaxToolkit:AutoCompleteExtender>
    </div>
    </form>


This is the standard demo code that is shipped with the Ajax Control Toolkit Sample Website.  I’ve simplified it a bit by removing the animations.  The only significant change I’ve made is to change the ServicePath from Autocomplete.asmx to Autocomplete.svc, the latter being the extension for a WCF service.

The next step is to create our service and add a GetCompletionList operation to it.  The easiest way to do this is to go to Add | New Item and just select the Ajax-enabled WCF Service item template, but this would be so easy that it is hardly worth doing.

Instead, create a new WCF Service using the WCF Service Item Template and call it Autocomplete.svc.  Visual Studio will automatically generate a service interface for you.  Delete the interface.  We don’t need it.  (To be more specific, I don’t know how to get this to work with an interface, so I’m just going to ignore that it is possible.)

Again, I am going to rip off the ACT sample app and just borrow the code from their webservice and place it in our WCF service.  The WCF service class (Autocomplete.svc.cs) will look like this:

    [ServiceContract(Namespace = "")]

    [AspNetCompatibilityRequirements(RequirementsMode = AspNetCompatibilityRequirementsMode.Allowed)]

    public class Autocomplete

    {


        [OperationContract]

        public string[] GetCompletionList(string prefixText, int count)

        {

            if (count == 0)

            {

                count = 10;

            }


            if (prefixText.Equals("xyz"))

            {

                return new string[0];

            }


            Random random = new Random();

            List<string> items = new List<string>(count);

            for (int i = 0; i < count; i++)

            {

                char c1 = (char)random.Next(65, 90);

                char c2 = (char)random.Next(97, 122);

                char c3 = (char)random.Next(97, 122);


                items.Add(prefixText + c1 + c2 + c3);

            }


            return items.ToArray();

        }


A few things worth noting:

1. Autocomplete does not implement the IAutocomplete Interface.  Even though this is generated automatically, with the WCF Service item template, you should remove it.

2. The service contract has a blank Namespace explicitly declared. 

3. The ASPNetCompatibilityRequirements attribute must be added to our class.


This takes care of the code that calls the WCF service, as well as the service itself.  We now have rig up the web.config file.  If you’ve been working with WCF for any length of time, then you know that this is where the problems usually occur.  Fortunately, the configuration is fairly simple.  You need to set up an endpoint behavior for your service that enables web scripting (much the way asmx web services must be decorated with the ScriptService attribute in order to be called from client-script).  You also will need to turn AspNetCompatibilityEanbled on for the hosting environment.


    <system.serviceModel>

        <behaviors>

            <endpointBehaviors>

                <behavior name="AjaxBehavior">

                    <enableWebScript/>

                </behavior>

            </endpointBehaviors>

        </behaviors>

        <serviceHostingEnvironment aspNetCompatibilityEnabled="true"/>

        <services>

            <service name="AutocompleteWCF.Autocomplete">

                <endpoint address="" behaviorConfiguration="AjaxBehavior" binding="webHttpBinding" contract="AutocompleteWCF.Autocomplete"/>

            </service>

        </services>

    </system.serviceModel>


And that is all you need to do make the AutoComplete Extender work with a WCF service instead of an asmx web service.  I told you it would be unimpressive.

Of course, using a WCF service for Ajax has all the limitations that using an asmx file for Ajax did.  First of all, you can’t call a service that is in a different domain than the page which hosts your client-code.  This is a security feature, to prevent malicious code from redirecting your harmless javascript to something nasty on the world wide web.

Second, you can’t call just any service from your client-side code.  The service must be explicitly marked as something that can be called from client code.  In asmx web services, we used ScriptService for this.  In WCF services, we similarly use EnableWebScript binding property.

Now I feel like I’ve wasted your time, so here’s a YouTube video of David Blaine to make up for it.  And remember, David Blaine is to Chris Angel what Daisy Duke was to Alexis Carrington.  It’s an existential thing, and at some point, you’ve just got to pick sides and stay put in a way that will determine who you are for the rest of your life.

Are you a David Blaine/Daisy Duke kind of person or are you a Chris Angel/Alexis Carrington sort?  Do some soul searching and please let me know what you learn about yourself.

Whither Ajax?

ajax

Ajax, the fleet son of Oileus, commanded the Locrians. He was not so great, nor nearly so great, as Ajax the son of Telamon. He was a little man, and his breastplate was made of linen, but in use of the spear he excelled all the Hellenes and the Achaeans. —The Iliad

Ajax son of Oileus is traditionally called Ajax the Lesser, while Ajax Telamon’s son is Ajax the Greater.  The Trojan War  is often portrayed as a battle between the national heroes of two great armies, Hector on one side, and Achilles on the other.  What makes the arraying of the sides peculiar is that, in fact, the Achaeans have two heroes that can defeat the war chief of the Trojans.  Both Achilles and Ajax the Greater are superior warriors to Hector.  This feature was actually a giveaway to many classicists back in 1959 that the newly released western Warlock was based on The Iliad.

Two years ago Microsoft began a campaign to carve out a niche in the Ajax world.  They did so with the release of .NET 3.0 and later .NET 3.5.  One of the innovated approaches they took to being a player in Ajax was to support an open source project called the Ajax Control Toolkit.

According to one of the contributors to the Toolkit, however, there have been no releases of the Toolkit for five months, and apparently no suggestions of any plans for the Toolkit:  http://forums.asp.net/t/1283218.aspx .

So is the Toolkit dead?  Is Microsoft’s determination to be a player in the Ajax domain waned, to be replaced by a greater interest in making Silverlight the Flash-killer?

Microsoft says no, and has published a new document explaining Microsoft’s Ajax roadmap  http://www.codeplex.com/aspnet/Release/ProjectReleases.aspx?ReleaseId=14924.  When it comes to RIAs, Microsoft is insisting that it is going forward with both Silverlight and Ajax. 

The specifics about the Toolkit are admittedly vague, however.  Somewhat more peculiar, a check of the contributors to the Toolkit project on Codeplex shows that at least half of them have not checked in any code for the past 60 days.

Which leads one to wonder: is ASP.NET AJAX named after Ajax son of Oileus, or Ajax son of Telamon?

Extending the Ajax Control Toolkit Tab Container with Lazy Loading

multi-tabs


download source code

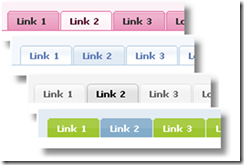
ASP.NET has been missing a good, free tab control for a long time.  With the ACT Tab Container, we were finally given one.  It typically runs in client-side only mode, but can interact with server-code if we set its AutoPostback property to true.

Compared to what we had before, it is a huge improvement.  The peculiar thing about it, however, is that it isn’t actually an Ajax control.  It doesn’t use asynchronous postbacks or web service calls to talk to the server — instead you just have these two mode: run it using client script only, or run it using server-side events and code-behind only.

So a few months ago I rectified this for a project, and only found out afterwards that Matt Berseth had already outlined the technique on his blog.  You basically run the tab container in client-side mode, and add update panels to the tab panels that you want to be ajaxy.  You then hook up the client-side ActivePageChanged event in such a way that it spoofs the Update Panel contained in the tab, causing an asynchronous (or partial) postback.

Matt also gave this technique a cool name.  He called it ‘lazy loading the tab panel’.  Like lazy loading in OOP, using this technique the update panels inside each tab panel only do something when its tab is selected.  Information is loaded only when its needed, and not before.

I must admit that I hold some resentment against Matt for coming up with this first, and for coming up with the cool moniker for it.  On the other hand, the solution I came up with encapsulates all of the javascript needed for this into a nice simple extender control that you can drop on your page, which his does not, and I’m rather proud of this.

The VS 2008 project for this extender is linked at the top of this post.  To use it, you need to compile the project and add the compiled assembly to your project, or else just add the project to your solution and add a project reference.

1. Drop the TabContainerExtender control into your page.

2. Set the Extender’s TargetControlID property to your TabContainer’s ID.

3. In the RegisterUpdatePanels element of the Extender, map your tabs to your update panels.  This mapping tells the extender which Update Panels to activate when each tab is selected.

Your markup will look something like this:

    <cc2:TabContainerExtender ID="TabContainerExtender1" 
    runat="server" 
    TargetControlID="TabContainer1" OnActiveTabChanged="ActiveTabChanged">
    <RegisterUpdatePanels>
    <cc2:UpdatePanelInfo TabIndex="0" UpdatePanelID="UpdatePanel1" />
    <cc2:UpdatePanelInfo TabIndex="1" UpdatePanelID="UpdatePanel2" />
    <cc2:UpdatePanelInfo TabIndex="2" UpdatePanelID="UpdatePanel3" />
    </RegisterUpdatePanels>
    </cc2:TabContainerExtender> 

4. If you want to add some code-behind to your active tab changed event, add set the OnActiveTabChanged property of the Extender to the name of your handler.  The thrown event will pass the correct Index number for the active Tab, as well as the ID of the mapped Update Panel.  The handler’s signature looks like this:

        protected void ActiveTabChanged(int index, string panelID)

        {

            …

        }

I highly encourage you to read Matt Berseth’s blog entry (which I have to admit is pretty good) to get a clear idea of the techniques being applied in this ajax extender.  If you just need a quick solution, however, feel free to download this code from the link at the top and use it any way you like with no strings attached.  There is a sample project attached to the solution that will demonstrate how to use the Tab Container Extender, in case you run into any problems with lazy loading your panels.

For reference, here is the code for the sample implementation, which loads controls on the fly based on the tab selected:

    <cc1:TabContainer ID="TabContainer1" runat="server">
    <cc1:TabPanel ID="TabPanel1" runat="server" HeaderText="Tab Panel 1">
    <ContentTemplate>
        <asp:UpdatePanel ID="UpdatePanel1" runat="server">
        <ContentTemplate>
        Content 1 ...
        <br />
            <asp:PlaceHolder ID="PlaceHolder1" runat="server"></asp:PlaceHolder>      
        </ContentTemplate>
        </asp:UpdatePanel>    
    </ContentTemplate>
    </cc1:TabPanel>
        <cc1:TabPanel ID="TabPanel2" runat="server" HeaderText="Tab Panel 2">
    <ContentTemplate>
        <asp:UpdatePanel ID="UpdatePanel2" runat="server">
        <ContentTemplate>
        Content 2 ...
        <br />
            <asp:PlaceHolder ID="PlaceHolder2" runat="server"></asp:PlaceHolder>      
        </ContentTemplate>
        </asp:UpdatePanel>    
    </ContentTemplate>
    </cc1:TabPanel>
        <cc1:TabPanel ID="TabPanel3" runat="server" HeaderText="Tab Panel 3">
    <ContentTemplate>
        <asp:UpdatePanel ID="UpdatePanel3" runat="server">
        <ContentTemplate>
        Content 3 ...
        <br />
            <asp:PlaceHolder ID="PlaceHolder3" runat="server"></asp:PlaceHolder>      
        </ContentTemplate>
        </asp:UpdatePanel>    
    </ContentTemplate>
    </cc1:TabPanel>
    </cc1:TabContainer>
    <cc2:TabContainerExtender ID="TabContainerExtender1" 
    runat="server" 
    TargetControlID="TabContainer1" OnActiveTabChanged="ActiveTabChanged">
    <RegisterUpdatePanels>
    <cc2:UpdatePanelInfo TabIndex="0" UpdatePanelID="UpdatePanel1" />
    <cc2:UpdatePanelInfo TabIndex="1" UpdatePanelID="UpdatePanel2" />
    <cc2:UpdatePanelInfo TabIndex="2" UpdatePanelID="UpdatePanel3" />
    </RegisterUpdatePanels>
    </cc2:TabContainerExtender> 

ASP.NET AJAX Server Controls and Extenders

Following the recent release of Visual Studio 2008, I scribed a new tutorial on ASP.NET AJAX Custom Controls using the new IDE.  I originally estimated two weeks for the project, but in order to put in everything I thought needed to be said about writing AJAX-enabled .NET controls, the effort took over six weeks.  Should you have any inclination to see it, you can find it here at www.codeproject.com.

The tutorial is built around the session timeout monitor I originally described at the Imaginative Universal: http://box5921.temp.domains/~imagipi2/SessionExpiredMonitorWithASPNETAJAX.aspx.  Since the code for the tutorial is intended primarily to be instructive, I still plan to write one more revision of the session timeout control, in order to streamline the functionality and try to incorporate the modal popup behavior from the AJAX Control Toolkit, which I will publish in the pages of this blog.

Session Expired Monitor with ASP.NET AJAX

timeout

code download

Sessions are a way of preserving information on a web site between page hits, allowing the programmer to emulate a stateful application when, in fact, web pages are not really stateful.  They are also one of the banes of web development, since sessions eventually timeout when there is no interaction between the user and the web app for a prolonged period of time.  In ASP.NET, this period has a default of 20 minutes, which is really hardly enough time to pick up a donut, refill one’s coffee, and chat with fellow workers before returning to one’s computer.  What this often means is that the user, upon returning to their computer and continuing work after a 20 minute break will find that all of the data entry they have been doing has been lost.  Worse, strange errors will begin to appear in his web browser if the loss of a session is not handled gracefully. 

The most common workaround is to increase the session grace period, called the session timeout.  This is set in your web.config file, and typically looks like this (the timeout period is measured in minutes):

  <system.web>
    <sessionState
      mode="InProc"
      cookieless="false"
      timeout="20"
     />
  </system.web>

A second way of handling this is to add extra code to an app that keeps the session state alive even if the user isn’t doing anything.

A third, and the most common, way is to provide code that redirects a user to a “session expired” page if they try to interact with a web page for which the session has timed-out.  This can be a bit awkward, however, since it is a passive solution that can cause the user some dismay as they hit a submit key only to be taken to a completely unexpected page.

This post deals with an active approach to the same problem.  When the user’s session has expired, it will generate a popup message in the user’s browser window letting him know that he has been inactive for too long.  Additionally it can redirect the browser to a new page with a warning message letting him know what happened.  The user still loses all of his work, of course, but at least this way he knows what happened when he returns to his desk following his coffee break.

This solution uses three tricks.  One is the event model for Master Pages in ASP.NET:  whenever a Content Page is refreshed, its OnLoad event is called,  along with the OnLoad events of the Master Page and any user controls hosted by either the Content Page or the Master Page (the actual order of these events is 1. controls on the Master Page, 2. controls in the Content Page, 3. the Master Page and finally 4. the Content Page).

The second trick is the way ASP.NET Extensions Timer control gets reset.  This is done simply by setting the interval to a new value.  Every time the interval is set to a new value, or even the same value, the countdown on the timer begins again.

The third trick is that the session timeout one sets in the web.config file can be read programmatically simply by querying a property of the Session object.

Putting all of this together, one can build a web user control that simply sits on a Master Page and knows when the user session is ready to expire.  It resets itself to the full timeout period any time a Content Page is refreshed.  when the session expires, the user control can raise an informative message, redirect to another page, or, potentially, simply extend the session timeout (not covered here, but easy to do if you are interested).

A user control to monitor the session timeout is included in the code sample linked at the top of this post.  Here is how you can build your own.

Session Timeout Monitor Recipe:

Ingredients:

  • One Master Page
  • One User Control
  • An Update Panel
  • An ASP.NET Ajax Extensions Timer
  • A Panel control
  • A Button control

1. Create a new User Control in your project. 

2. Drop an Update Panel on the User Control and set its mode property to “Always”.

3. Add an Extensions Timer (not to be confused with the Futures TimerControl) to your project, dropping it in the Update Panel.  Name it TimerTimeout.

Normally, this configuration of the timer control and a conditional update panel is used to refresh a portion of a web page on a regular schedule, for instance in order to create a self-updating clock display.  In this case, however, the timer and update panel are used simply to trigger a notification that the session has expired. 

4. In the User Control’s code behind, add the following lines to the OnLoad event:

        protected void Page_Load(object sender, EventArgs e)
        {
            int milliseconds = 60000;
            TimerTimeout.Interval = Session.Timeout * milliseconds;
        }

This event will be called any time a content page is refreshed.  Whenever this happens, the code inside the event handler resets the AJAX Extensions Timer control to the full session lifespan as set in the web config file, in effect making the timeout for the Timer match the timeout for the session.

Since the Timer control’s Interval property is measured in milliseconds, while the session.Timeout is measured in minutes, a conversion factor of sixty thousand must be used to translate one time period into the other.

To finish this notifier, the Timer’s Tick event needs to be handled.  The Tick event gets called when the Timer’s Interval finally runs out.  In this implementation, the Tick event can either generate a popup message or cause a page redirect.

5. Place a Panel inside the Update Panel.  Set its Visible property to false.

6. Write a simple message inside the Update Panel, such as “Your session has expired.”

7. Drop a Button inside the Panel.  This Button will be used to allow the user to hide the popup message.

8. Add a public property to the User Control called SessionExpiredRedirect:

        private string _sessionExpiredRedirect;

        public string SessionExpiredRedirect
        {
            get { return _sessionExpiredRedirect; }
            set { _sessionExpiredRedirect = value; }
        }

This will be used to set the web page to which the Timer will redirect the user upon session timeout.  If no value is set, a popup message will appear, instead.

9. Handle the Timer’s Tick event:

        protected void TimerTimout_Tick(object sender, EventArgs e)
        {

            if (!string.IsNullOrEmpty(SessionExpiredRedirect))
            {
                if (SessionExpiredRedirect.IndexOf("~")==0)
                    Response.Redirect(
                        VirtualPathUtility.ToAppRelative(
                        SessionExpiredRedirect));
                else
                    Response.Redirect(SessionExpiredRedirect);
            }
            else
                this.PanelTimeout.Visible = true;
        }

This handler checks to see if a value has been set for the SessionExpiredRedirect property.  If not, it makes the Panel control inside the Update Panel visible.

10. To make the Panel control truly popup, set its CssClass property to “timeoutMessage”.  Add the following css style to the page.

<style type="text/css">
.timoutMessage
{
    position:absolute;
    top:100px;
    left:200px;
    background-color:#F5F7F8;
    border-style:groove;
    border-color:Navy;
    padding:15px;
}
</style>

11. Finally, compile this User Control and drag it on to the Master Page.  In design mode, the user control will display a misleading exception message.  Just ignore it.

12. Make sure the Master Page includes an ASP.NET AJAX Script Manager component.

This completes the recipe.  Any Content Page in this project will now automatically include the timeout monitor you have built.  Cookies are optional: this recipe will work with a session managed either with cookies or in cookieless mode.  It will only work if the session mode is InProc.

Garnish with buttered radishes.  Serve at room temperature.

(Code snippets formatted using manoli.net.)