Emgu, Kinect and Computer Vision

monalisacv

Last week saw the announcement of the long awaited OpenCV 3.0 release, the open source computer vision library originally developed by Intel that allows hackers and artists to analyze images in fun, fascinating and sometimes useful ways. It is an amazing library when combined with a sophisticated camera like the Kinect 2.0 sensor. The one downside is that you typically need to know how to work in C++ to make it work for you.

This is where EmguCV comes in. Emgu is a .NET wrapper library for OpenCV that allows you to use some of the power of OpenCV on .NET platforms like WPF and WinForms. Furthermore, all it takes to make it work with the Kinect is a few conversion functions that I will show you in the post.

Emgu gotchas

The first trick is just doing all the correct things to get Emgu working for you. Because it is a wrapper around C++ classes, there are some not so straightforward things you need to remember to do.

1. First of all, Emgu downloads as an executable that extracts all its files to your C: drive. This is actually convenient since it makes sharing code and writing instructions immensely easier.

2. Any CPU isn’t going to cut it when setting up your project. You will need to specify your target CPU architecture since C++ isn’t as flexible about this as .NET is. Also, remember where your project’s executable is being compiled to. For instance, an x64 debug build gets compiled to the folder bin/x64/Debug, etc.

3. You need to grab the correct OpenCV C++ library files and drop them in the appropriate target project file for your project. Basically, when you run a program using Emgu, your executable expects to find the OpenCV libraries in its root directory. There are lots of ways to do this such as setting up pre-compile directives to copy the necessary files. The easiest way, though, is to just go to the right folder, e.g. C:\Emgu\emgucv-windows-universal-cuda 2.4.10.1940\bin\x64, copy everything in there and paste it into the correct project folder, e.g. bin/x64/Debug. If you do a straightforward copy/paste, just remember not to Clean your project or Rebuild your project since either action will delete all the content from the target folder.

4. Last step is the easiest. Reference the necessary Emgu libraries. The two base ones are Emgu.CV.dll and Emgu.Util.dll. I like to copy these files into a project subdirectory called libs and use relative paths for referencing the dlls, but you probably have your own preferred way, too.

WPF and Kinect SDK 2.0

I’m going to show you how to work with Emgu and Kinect in a WPF project. The main difficulty is simply converting between image types that Kinect knows and image types that are native to Emgu. I like to do these conversions using extension methods. I provided these extensions in my first book Beginning Kinect Programming about the Kinect 1 and will basically just be stealing from myself here.

I assume you already know the basics of setting up a simple Kinect program in WPF. In MainWindow.xaml, just add an image to the root grid and call it rgb:

<Grid> 
    <Image x:Name="rgb"></Image> 
</Grid> 


Make sure you have a reference to the Microsoft.Kinect 2.0 dll and put your Kinect initialization code in your code behind:

KinectSensor _sensor;
ColorFrameReader _rgbReader;


private void InitKinect()
{
    _sensor = KinectSensor.GetDefault();
    _rgbReader = _sensor.ColorFrameSource.OpenReader();
    _rgbReader.FrameArrived += rgbReader_FrameArrived;
    _sensor.Open();
}

public MainWindow()
{
    InitializeComponent();
    InitKinect();
}


protected override void OnClosing(System.ComponentModel.CancelEventArgs e)
{
    if (_rgbReader != null)
    {
        _rgbReader.Dispose();
        _rgbReader = null;
    }
    if (_sensor != null)
    {
        _sensor.Close();
        _sensor = null;
    }
    base.OnClosing(e);
}


Kinect SDK 2.0 and Emgu


You will now just need the extension methods for converting between Bitmaps, Bitmapsources, and IImages. In order to make this work, your project will additionally need to reference the System.Drawing dll:

static class extensions
{

    [DllImport("gdi32")]
    private static extern int DeleteObject(IntPtr o);


    public static Bitmap ToBitmap(this byte[] data, int width, int height
        , System.Drawing.Imaging.PixelFormat format = System.Drawing.Imaging.PixelFormat.Format32bppRgb)
    {
        var bitmap = new Bitmap(width, height, format);

        var bitmapData = bitmap.LockBits(
            new System.Drawing.Rectangle(0, 0, bitmap.Width, bitmap.Height),
            ImageLockMode.WriteOnly,
            bitmap.PixelFormat);
        Marshal.Copy(data, 0, bitmapData.Scan0, data.Length);
        bitmap.UnlockBits(bitmapData);
        return bitmap;
    }

    public static Bitmap ToBitmap(this ColorFrame frame)
    {
        if (frame == null || frame.FrameDescription.LengthInPixels == 0)
            return null;

        var width = frame.FrameDescription.Width;
        var height = frame.FrameDescription.Height;

        var data = new byte[width * height * PixelFormats.Bgra32.BitsPerPixel / 8];
        frame.CopyConvertedFrameDataToArray(data, ColorImageFormat.Bgra);

        return data.ToBitmap(width, height);
    }

    public static BitmapSource ToBitmapSource(this Bitmap bitmap)
    {
        if (bitmap == null) return null;
        IntPtr ptr = bitmap.GetHbitmap();
        var source = System.Windows.Interop.Imaging.CreateBitmapSourceFromHBitmap(
        ptr,
        IntPtr.Zero,
        Int32Rect.Empty,
        System.Windows.Media.Imaging.BitmapSizeOptions.FromEmptyOptions());
        DeleteObject(ptr);
        return source;
    }

    public static Image<TColor, TDepth> ToOpenCVImage<TColor, TDepth>(this ColorFrame image)
        where TColor : struct, IColor
        where TDepth : new()
        {
            var bitmap = image.ToBitmap();
            return new Image<TColor, TDepth>(bitmap);
        }

    public static Image<TColor, TDepth> ToOpenCVImage<TColor, TDepth>(this Bitmap bitmap)
        where TColor : struct, IColor
        where TDepth : new()
    {
        return new Image<TColor, TDepth>(bitmap);
    }

    public static BitmapSource ToBitmapSource(this IImage image)
    {
        var source = image.Bitmap.ToBitmapSource();
        return source;
    }
   
}

Kinect SDK 2.0 and Computer Vision


Here is some basic code to use these extension methods to extract an Emgu IImage type from the ColorFrame object each time Kinect sends you one and then convert the IImage back into a BitmapSource object:

void rgbReader_FrameArrived(object sender, ColorFrameArrivedEventArgs e)
{
    using (var frame = e.FrameReference.AcquireFrame())
    {
        if (frame != null)
        {
            var format = PixelFormats.Bgra32;
            var width = frame.FrameDescription.Width;
            var height = frame.FrameDescription.Height;
            var bitmap = frame.ToBitmap();
            var image = bitmap.ToOpenCVImage<Bgr,byte>();

            //do something here with the IImage 
            //end doing something


            var source = image.ToBitmapSource();
            this.rgb.Source = source;

        }
    }
}


face_capture

You should now be able to plug in any of the sample code provided with Emgu to get some cool CV going. As an example, in the code below I use the Haarcascade algorithms to identify heads and eyes in the Kinect video stream. I’m sampling the data every 10 frames because the Kinect is sending 30 frames a second while the Haarcascade code can take as long as 80ms to process. Here’s what the code would look like:

int frameCount = 0;
List<System.Drawing.Rectangle> faces;
List<System.Drawing.Rectangle> eyes;

void rgbReader_FrameArrived(object sender, ColorFrameArrivedEventArgs e)
{
    using (var frame = e.FrameReference.AcquireFrame())
    {
        if (frame != null)
        {
            var format = PixelFormats.Bgra32;
            var width = frame.FrameDescription.Width;
            var height = frame.FrameDescription.Height;
            var bitmap = frame.ToBitmap();
            var image = bitmap.ToOpenCVImage<Bgr,byte>();

            //do something here with the IImage 
            int frameSkip = 10;
            //every 10 frames

            if (++frameCount == frameSkip)
            {
                long detectionTime;
                faces = new List<System.Drawing.Rectangle>();
                eyes = new List<System.Drawing.Rectangle>();
                DetectFace.Detect(image, "haarcascade_frontalface_default.xml", "haarcascade_eye.xml", faces, eyes, out detectionTime);
                frameCount = 0;
            }

            if (faces != null)
            {
                foreach (System.Drawing.Rectangle face in faces)
                    image.Draw(face, new Bgr(System.Drawing.Color.Red), 2);
                foreach (System.Drawing.Rectangle eye in eyes)
                    image.Draw(eye, new Bgr(System.Drawing.Color.Blue), 2);
            }
            //end doing something


            var source = image.ToBitmapSource();
            this.rgb.Source = source;

        }
    }
}

Unity 5 and Kinect 2 Integration

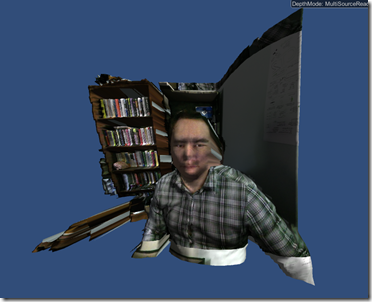
pointcloud

Until just this month one of the best Kinect 2 integration tools was hidden, like Rappuccini’s daughter, inside a walled garden. Microsoft released a Unity3D plugin for the Kinect 2 in 2014. Unfortunately, Unity 4 only supported plugins (bridges to non-Unity technology) if you owned a Unity Pro license which typically cost over a thousand dollars per year.

On March 3rd, Unity released Unity 5 which includes plugin support in their free Personal edition – making it suddenly very easy to start building otherwise complex experiences like point cloud simulations that would otherwise require a decent knowledge of C++. In this post, I’ll show you how to get started with the plugin and start running a Kinect 2 application in about 15 minutes.

(As an aside, I always have trouble keeping this straight: Unity has plugins, openFrameworks as add-ins, while Cinder has bricks. Visual Studio has extensions and add-ins as well as NuGet packages after a confusing few years of rebranding efforts. There may be a difference between them but I can’t tell.)

1. First you are going to need a Kinect 2 and the Unity 5 software. If you already have a Kinect 2 attached to your XBox One, then this part is easy. You’ll just need to buy a Kinect Adapter Kit from the Microsoft store. This will allow you to plug your XBox One Kinect into your PC. The Kinect for Windows 2 SDK is available from the K4W2 website, though everything you need should automatically install when you first plug your Kinect into your computer. You don’t even need Visual Studio for this. Finally, you can download Unity 5 from the Unity website.

linktounityplugin

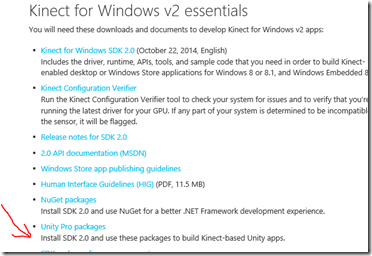
2. The Kinect 2 plugin for Unity is a bit hard to find. You can go to this Kinect documentation page and scroll half-way down to find the link called Unity Pro Packages. Aternatively, here is a direct link to the most current version of the plugin as of this writing.

unitypluginfolder

3. After you finish downloading the zip file (currently called KinectForWindows_UnityPro_2.0.1410.zip), extract it to a known location. I like to use $\Documents\Unity. Inside you will find three plugins as well as two sample scenes. The three Kinect plugins are the basic one, a face recognition plugin, and a gesture builder plugin, each wrapping functionality from the Kinect 2 SDK.

newunityproject

4. Fire up Unity 5 and create a new project in your known folder. In my case, I’m creating a project called “KinectUnityProject” in the $\Documents\Unity folder where I extracted the Kinect plugins and related assets.

import

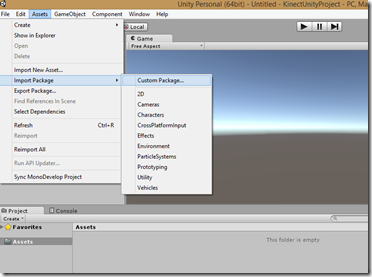
5. Now we will add the Kinect plugin into our new project. When the Unity IDE opens, select Assets from the top menu and then select Import Package | Custom Package …

selectplugin

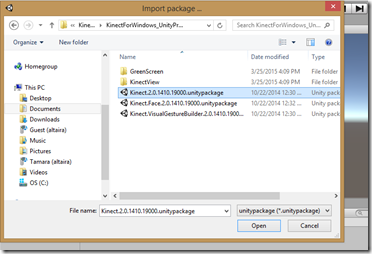
6. Navigate to the folder where you extracted the KinectforWindows_Unity components and select the Kinect2.0.xxxxx.unitypackage file. That’s our plugin along with all the scripts needed to build a Kinect-enabled Unity 5 application. After clicking on “Open”, an additional dialog window will open up in the Unity IDE called “Importing Package” with lots of files checked off. Just click on the “Import” button at the lower right corner of the dialog to finish the import process. Two new folders will now be added to your Project window under the Assets folder called Plugins and Standard Assets. This is the baseline configuration for any Kinect project in Unity.

unitywarning

7. Now we’ll get a Kinect with Unity project quickly going by simply copying one of the sample projects provided by the Microsoft Kinect team. Go into file explorer and copy the folder called “KinectView” out of the KinectforWindows_Unity folder where you extracted the plugins and paste it into the Assets directory in your project folder. Then return to the Unity 5 IDE. A warning message will pop up letting you know that there are compatibility issues between the plugin and the newest version of Unity and that files will automatically be updated. Go ahead and lie to the Unity IDE. Click on “I Made a Backup.”

added_assets

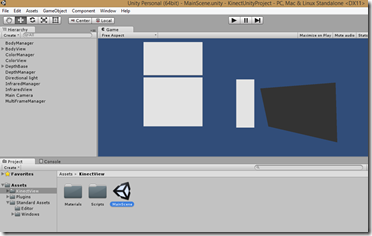
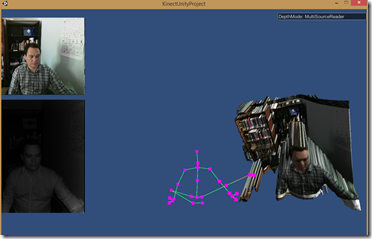
8. A new folder has been added to your Project window under Assets called KinectView. Select KinectView and then double click on the MainScene scene contained inside it. This should open up your Kinect-enabled scene inside the game window. Click on the single arrow near the top center of the IDE to see your application in action. The Kinect will automatically turn on and you should see a color image, an infrared image, a rendering of any bodies in the scene and finally a point cloud simulation.

allthemarbles

9. To build the app, select File | Build & Run from the top menu. Select Windows as your target platform in the next dialog and click the Build & Run button at the lower right corner. Another dialog appears asking you to select a location for your executable and a name. After selecting an executable name, click on Save in order to reach the final dialog window. Just accept the default configuration options for now and click on “Play!”. Congratulations. You’ve just built your first Kinect-enabled Unity 5 application!

Screens, Sensors and Engines

Valve’s recent announcement about their new Vive headset for virtual reality as well as Epic’s announcement that the Unreal Engine is now free made me realize that it is time to once again catalog the current set of future technologies vying for our attention. Just as pre-NUI computer users need the keyboard and mouse, the post-NUI user needs sensors and just as the pre-NUI user required a monitor to see what she was doing, the post-NUI user needs a headset. Here is the list for 2015 from which, you will notice, Google Glass is now absent:


Virtual Reality Augmented Reality Sensors Development Platforms
       
Oculus Rift Microsoft HoloLens Microsoft Kinect 2 Unity 3D
Samsung Gear VR Magic Leap Leap Motion Unreal Engine
Google Cardboard castAR Myo WPF
Valve HTC Vive Epson Moverio Intel RealSense Cinder
Sony Project Morpheus   Orbbec openFrameworks
OSVR Razer   Eye Tribe Tracker  
Zeiss VR One      
       

Kinect SDK 2.0 Live!

WP_20141022_009

Today the Kinect SDK 2.0 – the development kit for the new, improved Kinect version 2 – went live.  You can download it immediately.

Kinect for Windows v2 is now out of its beta and pre-release phase.

Additionally, the Windows Store will now accept apps developed for Kinect. If you have a Kinect for Windows v2 sensor and are running Windows 8, you will be able to use it to run apps you’ve downloaded from the Windows Store.

And if you don’t have a Kinect for Windows v2? In that case, you can use the Kinect sensor from your XBox One and – with a $50 adapter that Microsoft just released – turn it into a sensor you can use with your Windows 8 computer.

You basically now have a choice of purchasing a Kinect for Windows v2 kit for $200, or a separate Kinect for Xbox One for $150 and an adapter for $50.

Alternatively, if you already have the sensor that came with your Xbox One, Microsoft has effectively lowered the entry bar to $50 so you can start trying the new Kinect:

1. Buy the Kinect v2 adapter.

2. Download the SDK to your 64-bit Windows 8 machine.

3. Detach the Kinect from your XBox One and plug it into your computer.

A Guide to Kinect related sessions at //build 2014

lauren

Build is over and there were some cool announcements as well as sessions related to Kinect for Windows v2.  I’ve added links below to the Kinect sessions as well as some additional sessions I found interesting. 

The second of these links concerns using Kinect v2 for Windows Store apps (they only run on Win8 Pro, not WinRT – but still pretty cool).

Kinect 101: Introduction to Kinect for Windows: http://channel9.msdn.com/Events/Build/2014/2-514

Bringing Kinect into Your Windows Store App:
http://channel9.msdn.com/Events/Build/2014/2-532


Since Kinect was initially designed for XBox, I found these XBox One sessions pretty enlightening:

Understanding the Xbox One Game Platform Built on Windows: http://channel9.msdn.com/Events/Build/2014/2-651

Leveraging Windows Features to Build Xbox One App Experiences: http://channel9.msdn.com/Events/Build/2014/3-648


Here’s a session on how to develop newly announced “universal apps” – which isn’t directly tied to Kinect development, but may be one day:

Building Windows, Windows Phone, and Xbox One Apps with HTML/JS/CSS & C++:  http://channel9.msdn.com/Events/Build/2014/2-649


Two C++ sessions, just kuz:

Modern C++: What You Need to Knowhttp://channel9.msdn.com/Events/Build/2014/2-661

Native Code Performance on Modern CPUs: A Changing Landscape: http://channel9.msdn.com/Events/Build/2014/4-587


Finally, here’s an all-too-short channel 9 panel discussion with friend Rick Barraza from Microsoft and some dudes from Obscura and Stimulant talking about design and dropping some great one-liners I plan to steal and so can you (note the excellent use of the $12K 46-inch massive multi-touch Perceptive Pixel device in the background):

build 

Experience at the Intersection of Design and Development: http://channel9.msdn.com/Events/Build/2014/9-003

Razzle Dazzle

kinect for XBox One

People continue to ask what the difference is between the Kinect for XBox One and the Kinect for Windows v2.  I had to wait to unveil the Thanksgiving miracle to my children, but now I have some pictures to illustrate the differences.

side by side

On the sensors distributed through the developer preview program (thank you Microsoft!) there is a sticker along the top covering up the XBox embossing on the left.  There is an additional sticker covering up the XBox logo on the front of the device.  The power/data cables that comes off of the two  sensors look a bit like tails.  Like the body of the sensors, the tails are also identical.  These sensors plug directly into the XBox One.  To plug them into a PC, you need an additional adapter that draws power from a power cord and sends data to a USB 3.0 cable and passes both of these through the special plugs shown in the picture below.

usb

So what’s with those stickers?  It’s a pattern called razzle dazzle (and sometimes razzmatazz).  In World War I, it was used as a form of camouflage for war ships by the British navy.  It’s purpose is to confuse rather than conceal — to obfuscate rather than occlude.

war razzle dazzle

Microsoft has been using it not only for the Kinect for Windows devices but also in developer units of the XBox One and controllers that went out six months ago. 

This is a technique of obfuscation popular with auto manufacturers who need to test their vehicles but do not want competitors or media to know exactly what they are working on.  At the same time, automakers do use this peculiar pattern to let their competitors and the media know that they are, in fact, working on something.

car razzle dazzle

What we are here calling razzle dazzle was, in a more simple age, called the occult.  Umberto Eco demonstrates in his fascinating exploration of the occult, Foucault’s Pendulum, that the nature of hidden knowledge is to make sure other people know you have hidden knowledge.  In other words, having a secret is no good if people don’t know you have it.  Dr. Strangelove expressed it best in Stanley Kubrick’s classic film:

Of course, the whole point of a Doomsday Machine is lost if you keep it a secret!

A secret, however, loses its power if it is ever revealed.  This has always been the difficulty of maintaining mystery series like The X-Files and Lost.  An audience is put off if all you ever do is constantly tease them without telling them what’s really going on. 

magic

By the same token, the reveal is always a bit of a letdown.  Capturing bigfoot and finding out that it is some sort of hairy hominid would be terribly disappointing.  Catching the Loch Ness Monster – even discovering that it is in fact a plesiosaur that survived the extinction of the dinosaurs – would be deflating compared to the sweetness of having it exist as a pure potential we don’t even believe in.

This letdown even applies to the future and new technologies.  New technologies are like bigfoot in the way they disappoint when we finally get our hands on them.  The initial excitement is always short-lived and is followed by a peculiar depression.  Such was the case in an infamous blog post by Scott Hanselman called Leap Motion Amazing, Revolutionary, Useless – but known informally as his Dis-kinect post – which is an odd and ambivalent blend of snarky and sympathetic.  Or perhaps snarky and sympathetic is simply our constant stance regarding the always impending future.

bigfoot

The classic bad reveal – the one that traumatized millions of idealistic would-be Jedi – is the quasi-scientific explanation of midichlorians  in The Phantom Menace.   The offences are many – not least because the mystery of the force is simply shifted to magic bacteria that pervade the universe and live inside sentient beings – an explanation that explains nothing but does allow the force to be quantified in a midichlorian count. 

The midichlorian plot device highlights an important point.  Explanations, revelations and unmaskings do not always make things easier to understand, especially when it’s something like the force that, in some sense, is already understood intuitively.  Every child already knows that by being good, one ultimately gets what one wants and gets along with others.  This is essentially the lesson of that ancient Jedi religion – by following the tenets of the Jedi, one is able to move distant objects with one’s will, influence people, and be one with the universe.  An over-analysis of this premise of childhood virtue destroys rather than enlightens.

the force razzle dazzle

The force, like virtue itself, is a kind of razzle dazzle – by obfuscating it also brings something into existence – it creates a secret.  In attempts to explain the potential of the Kinect sensor, people often resort to images of Tom Cruise at the Desk of the Future or Picard on the holodeck.  The true emotional connection, however, is with that earlier (and adolescent) fantasy awakened by A New Hope of moving things by simply wanting them to move, or changing someone’s mind with a wave of the hand and a few words – these are not the droids you are looking for.  Ben Kenobi’s trick in turn has its primordial source in the infant’s crying and waving of the arms as a way to magically make food appear. 

It’s not coincidental, after all, that Kinect sensors have always had both a depth sensor to track hand movements as well as a virtual microphone array to detect speech.

Free XBox One with purchase of Kinect

the difference between the Kinect and Kinect for Windows

It’s true.  In November, Microsoft will release the Kinect 2 for approximately $500.  The new Kinect2 comes with HD video at 30 fps (we currently get 640×480 with the Kinect1), much improved skeleton tracking and improved audio tracking.  One of the most significant changes is in depth tracking.  Instead of the Primesense structured light technology used in Kinect1, Kinect2 uses the more traditional and more accurate time-of-flight technology.  Since most Time of Flight depth cameras start at around $1K, getting this in a Kinect2 along with all the other features for half that price is pretty amazing.

But the deal doesn’t stop there.  If you buy the Kinect for XBox, you automatically get an XBox for free!  You actually can’t even buy the XBox on its own.  You only can get it if you buy the Kinect2.

How do they give the new XBox One away for free you may ask?  Apparently the price of the XBox One will be subsidized through game sales.  Since the games for XBox will tend to have some sort of Kinect capability – enabled by the requirement that you can’t get the XBox on its own – the expectation seems to be that these unique games will get enough sales that, through volume, the cost of producing the XBox One will eventually be recouped.

But what if you aren’t interested in gaming?  What if – like at my company, Razorfish – you are mainly interested in building commercial interfaces and artistic experiences with the Kinect technologies. 

In this case, Microsoft will be providing another version of the Kinect (one assumes that it will be called something like Kinect2 for Windows or perhaps K4W2 – its Star Wars droid name) that has a USB 3 adapter that will plug into a PC.  And because it is for people who are not interested in gaming, it will probably cost a bit less than $500 to make up for the fact that it doesn’t come with a free XBox One and won’t ever recoup that hardware cost from non-gamers.  By the way, this version of the Kinect sensor will be released some time – perhaps months? — following the K4X1 November release.

Finally, to make the distinction between the two kinds of Kinect2s clear, the Kinect2 for XBox will not plug into a PC and Kinect2 for Windows will not plug into an XBox.  It’s just cleaner that way.

With the original Kinect, there was quite a bit of confusion introduced by the fact that when it was released it used a typical USB connector that could be plugged into either the XBox 360 or a PC.  This turned out to be a great thing for Microsoft because it set off an amazing flood of creativity among hackers who started building their own frameworks and drivers to read the USB data and then build applications on top of it. 

Overnight, this grassroots Kinect Hacks movement made Microsoft cool again.  There is currently talk going around that the USB connector on the Kinect was simply fortuitous.  I’m pretty sure, however, that it was prescient – at least on someone’s part – and the intent was – again on someone’s part if not everyone’s – to provide the sort of platform that could be taken advantage of to build more than games.

As Microsoft moved forward with the development of the Kinect SDK as a platform for developers to build Kinect applications on, they decided that this should be coupled with a special version of the “Kinect” called Kinect for Windows that would carry special firmware supporting near mode.  Additionally, the commercial version of the hardware (which was pretty much the same as the the gaming version of the hardware) required a special dongle (see photo above) that would help regulate the power on PCs. The biggest difference between the two Kinects, however, was the licensing terms and the price.  Basically, if you wanted to use Kinect technology commercially with the Kinect SDK, you needed to use the Kinect for Windows sensor which carried a higher, un-subsidized price. 

This, naturally, caused a lot of confusion.  People wondered why Microsoft was overcharging for the commercial version of the sensor when with a Copernican frame of mind that might have just as easily asked why Microsoft was undercharging for the gaming version of the sensor.

With the Kinect2 sensors, all of this confusion is removed by fiat since the gaming version and commercial version now have different connectors.  From a hardware standpoint, rather than merely a legal one, you cannot use your gaming sensor with a PC.

Of course, you could also perform a Copernican revolution on my framing above and suggest that it isn’t the XBox One that is being subsidized through the purchase of the Kinect2 but rather the Kinect2 that is being subsidized through the purchase of the XBox One.

It’s all a bit of an accounting trick, isn’t it?  Basically the money has to come from somewhere.  Given that Microsoft received a lot of free, positive PR from the Kinect hacking movement, it would be cool if they gave a little back and made the non-gaming Kinect2 sensor more accessible. 

Contrarily, however, it is already the case that a time-of-flight camera for under $500 along with all the other features loaded onto the Kinect2 is a pretty amazing deal for weekend coders, installation artists, and retailers. 

In any case, it gives me peace of mind to think of the Kinect2 sensor as a $500 device that comes with a free XBox One.  A lot of the angst I might otherwise feel about pricing simply melts away.  Though if Microsoft felt like subsidizing the price of the K4W2 sensor with some of the excess money they make off of Sharepoint licenses, I’d be cool with that, too.