WCF REST Starter Kit 2: Calling Twitter

The great power of the WCF REST starter Kit comes from allowing programmers to easily call pre-existing REST services written on non-Microsoft platforms.  Of those, Twitter is probably the most popular and easiest to understand.  In order to use twitter, we need at a bare minimum to be able to read tweets, to write tweets, and occasionally to delete a tweet.  Doing this also showcases the core structure of REST calls: they allow us to perform CRUD operations using the following web methods: GET, POST, PUT and DELETE.

The following example will use GET to read tweets, POST to insert tweets, and DELETE to remove tweets.

Ingredients: Visual Studio 2008 SP1 (C#), WCF REST Starter Kit Preview 2, a Twitter account

Sample: download (10 KB)

In this tutorial, I will walk you through building a simple Twitter command line application — I know, I know, Twitter from a console is what we’ve all been longing for!

This tutorial will use the techniques from the previous Getting Started post on WCF REST and expand on them to develop a “real world” application.

The first stop is the documentation on the Twitter API, which can be found here.  Based on the documentation, we can see that we want to call the friends_timeline resource in order to keep up with our twitter buddies.  We will want the update resource in order to insert new tweets.  We will also want the destroy resource so we can immediately delete tweets like “I am testing my console app”, “testing again”, “still testing 3”, etc.

Reading our friends’ tweets is the easiest part of all this.  The basic code looks like this:

var client = new HttpClient();


//set authentication credential

NetworkCredential cred = new NetworkCredential(_userName, _password);

client.TransportSettings.Credentials = cred;


//set page parameter

var queryString = new HttpQueryString();

queryString.Add(“page”, page.ToString());


//call Twitter service

var response =

        client.Get(

        new Uri(“http://twitter.com/statuses/friends_timeline.xml”)

        , queryString);


var statuses = response.Content.ReadAsXmlSerializable<statuses>();

foreach (statusesStatus status in statuses.status)

{

    Console.WriteLine(string.Format(“{0}: {1}”

        , status.user.name

        , status.text));

    Console.WriteLine();

    Console.WriteLine();

}

Twitter uses basic authentication to identify users.  To insert this information into our header, we create a new Network Credential and just inject it into our HttpClient instance.  (_userName and _password are simply private static fields I created as placeholders.)  The service can also take a “page” parameter that identifies which page of our friends’ statuses we want to view.  This code uses the HttpQueryString type that comes with the Starter Kit to append this information.

The results should look something like this:

console4

Probably the trickiest thing in getting this up and running is using Paste XML as Types from the Edit menu in order to generate the statuses class for deserialization.  To get the raw XML, you will need to browse to http://twitter.com/statuses/friends_timeline.xml, at which point you will be prompted for your Twitter account name and password.  In my case, I then copied everything out of the browser and pasted it into notepad.  I then stripped out the XML declaration, as well as all the hyphens that IE puts in for readability.  Having too many status elements turned out to make Visual Studio cry, so I removed almost all of them leaving only two.  Leaving two turned out to be important, because this allowed the underlying Paste XML as Types code to know that we were dealing with an array of status elements and to generate our classes appropriately.  At the end of this exercise, I had a statuses class, statusesStatus, statusesStatusUser, and a few others.

Posting a twitter status is a little bit harder, partly due to the way the Twitter API implements it.  Here’s the basic code for that:

var client = new HttpClient();


//set authentication credential

NetworkCredential cred = new NetworkCredential(_userName, _password);

client.TransportSettings.Credentials = cred;


//fix weird twitter problem

System.Net.ServicePointManager.Expect100Continue = false;


//send update

if (p.Length > 140) p = p.Substring(0, 140);

HttpContent body = HttpContent.Create(string.Format(“status={0}&source={1}”

    , HttpUtility.UrlEncode(p)

    , “CommandLineTwitterer”)

    , Encoding.UTF8

    , “application/x-www-form-urlencoded”);


var response = client.Post(“http://twitter.com/statuses/update.xml”, body);

Console.WriteLine(“Your tweet was twutted successfully.”);

This took a bit of trial and error to figure out, and in the end I just opened my Twitter home page with the Web Development Helper to see what the message was supposed to look like.  The Expect100Continue is needed to handle a change in Twitter’s API that showed up sometime at the beginning of the year, and which is explained here, here and here.

In order to make delete workable in a console application, I have tacked the following lines of code to the end of the status update method:

var status = response.Content.ReadAsXmlSerializable<status>();

_lastTweetId = status.id;

which hangs onto the id of the successful tweet so the user can turn around and perform a DESTROY command in order to delete the previous tweet.


You will notice that in the above snippet, I am using a type called status instead of one the objects associated with statuses from the simple GET service call above.  It is actually identical to the statusesStatus type above.  I gen-ed the status class out of the response simply because I needed a class called “status” in order to map the XML element returned to a clr type.  An alternative way to do this is to add an XmlRoot attribute to the statusesStatus class in order to make the serialization work properly:


[System.Xml.Serialization.XmlRoot(“status”)]

public partial class statusesStatus

{

    …

This would allow us to write our deserialize code like this:

var status = response.Content.ReadAsXmlSerializable<statusesStatus>();

_lastTweetId = status.id;

The delete code finishes off this recipe since it will demonstrate using one of the methods one rarely sees in typical REST examples (the other being PUT) .  It looks like this:


if (_lastTweetId == 0)

    return;


HttpClient client = new HttpClient();


//set authentication credential

NetworkCredential cred = new NetworkCredential(_userName, _password);

client.TransportSettings.Credentials = cred;

HttpResponseMessage response = null;

response = client.Delete(

    string.Format(“http://twitter.com/statuses/destroy/{0}.xml”

        , _lastTweetId)

    );

In order to pull this all together and have a functioning app, you just need a simple processing method.  The main processing code here that interprets commands and calls the appropriate methods simply loops until the EXIT command is called:

static void Main(string[] args)

{

    if (!CheckArgsForCredentials(args))

        SetCredentials();


    var input = string.Empty;

    while (input.ToUpper() != “EXIT”)

    {

        input = ProcessInput(Console.ReadLine());

    }

}


private static string ProcessInput(string input)

{

    //INPUT = READ

    if (input.ToUpper().IndexOf(“READ”) > -1)

    {

        if (input.ToUpper().IndexOf(“PAGE”) > -1)

        {

            var iPage = GetPageNumber(input);

            ReadFriendsTimeline(iPage);

        }

        else if (input.ToUpper().IndexOf(“ME”) > -1)

        {

            ReadUserTimeline();

        }

        else

            ReadFriendsTimeline(1);


    }

    //INPUT = TWEET

    else if (input.ToUpper().IndexOf(“TWEET”) > -1)

    {

        UpdateTwitterStatus(input.Substring(5).Trim());

    }

    //INPUT = DESTROY

    else if (input.ToUpper().IndexOf(“DESTROY”) > -1)

    {

        DestroyLastTweet();

    }

    return input;

}

This should give you everything you need to cobble together a simple Twitter client using the WCF REST Starter Kit.  Mention should be made of Aaron Skonnard’s excellent blog. After spending half a day on this I discovered that Aaron Skonnard had already written a much more succinct and elegant example of calling Twitter using the HttpClient.  I also found this cool example from Kirk Evans’s blog explaining how to accomplish the same thing using WCF without the HttpClient.

The full source code (10K) for this sample app has the properly generated types for deserialization as well as exception handling and status code handling, in case you run into any problems.  In order to run it, you will just need to add in the pertinent assemblies from the WCF REST Starter Kit Preview 2.

Getting Started with the WCF REST Starter Kit Preview 2 HttpClient

Ingredients: Visual Studio 2008 SP1 (C#), WCF REST Starter Kit Preview 2

In Preview 1 of the WCF REST Starter Kit, Microsoft provided many useful tools for building RESTful services using WCF.  Missing from those bits was a clean way to call REST services from the client.  In Preview 2, which was released on March 13th, this has been made up for with the HttpClient class and an add-in for the Visual Studio IDE called Paste XML as Types.

The following getting-started tutorial will demonstrate how to use the HttpClient class to call a simple RESTful service (in fact, we will use the default implementation generated by the POX service template).  If you haven’t downloaded and installed the WCF REST Starter Kit, yet, you can get Preview 2 here. You can read more about the Starter Kit on Ron Jacobs’ site.

The sample solution will include two projects, one for the client and one for the service. 

1. Start by creating a Console Application project and solution called RESTfulClient.

2. Add a new project to the RESTfulClient solution using the Http Plain XML WCF Service project template that was installed when you installed the Starter Kit.  Call your new project POXService. 

The most obvious value-added features of the WCF REST Starter Kit are the various new project templates that are installed to make writing RESTful services easier.  Besides the Http Plain XML WCF Service template, we also get the ATOM Publishing Protocol WCF Service, the ATOM Feed WCF Service, REST Collection WCF Service, REST Singleton WCF Service and good ol’ WCF Service Application.

PoxService 

For this recipe, we will just use the default service as it is. 

[WebHelp(Comment = “Sample description for GetData”)]

[WebGet(UriTemplate = “GetData?param1={i}&param2={s}”)]

[OperationContract]

public SampleResponseBody GetData(int i, string s)

{


   return new SampleResponseBody()

   {

     Value = String.Format(“Sample GetData response:”   {0}’, ‘{1}'”, i, s)

   };

}

For the most part, this is a pretty straightforward WCF Service Method.  There are some interesting additional elements, however, which are required to make the service REST-y.

(In a major break with convention, you will notice that the default service created by this template is called Service rather than Service1.  I, for one, welcome this change from our new insect overlords.)

The WebGet attribute, for instance, allows us to turn our service method into a REST resource accessed using the GET method.  The UriTemplate attribute parameter specifies the partial Uri for our resource, in this case GetData.  We also specify in the UriTemplate how parameters can be passed to our resource.  In this case, we will be using a query string to pass two parameters, param1 and param2.

By default, the template provides a Help resource for our service, accessed by going to http://localhost:<port>/Service.svc/Help .  It will automatically include a description of the structure of our service.  The WebHelp attribute allows us to add further notes about the GetData resource to the Help resource.

You will also notice that the GetData service method returns a SampleResponseBody object.  This is intended to make it explicit in our design that we are not making RPC’s.  Instead, we are receiving and returning messages (or documents, if you prefer).  In this case, the message we return is simply the serialized version of SimpleResponseBody, which is a custom type that is specified in the service.svc.cs file and which does not inherit from any other type.

public class SampleResponseBody
{
    public string Value { get; set; }
}

3. Right click on the PoxService project and select Debug | Start New Instance to see what our RESTful service looks like.  To see what the service does, you can browse to http://localhost:<port>/Service.svc/Help .  To see what the schema for our GetData resouce looks like, go to http://localhost:<port>/Service.svc/help/GetData/response/schema .  Finally, if you want to go ahead and call the GetData service, browse to http://localhost:<port>/Service.svc/GetData .

(In the rest of this tutorial, I will simply use  port 1300, with the understanding that you can specify your own port in the code.  By default, Visual Studio will randomly pick a port for you.  If you want to specify a particular port, however, you can go into the project properties of the PoxService project and select a specific port in the project properties Web tab.)

<SampleResponseBody xmlns:i="http://www.w3.org/2001/XMLSchema-instance">
<Value>Sample GetData response: '0', ''</Value> 
</SampleResponseBody>

4. Go to the RESTfulClient project and add a new class called SampleResponseBody.  We are going to create a type for deserializing our SampleResponseBody XML element.  We could write out the class by hand, and prior to Preview 2 we probably would have had to.  It is no longer necessary, however.  If you copy the XML returned from browsing our resource (you may need to use View Source in your browser to get a clean representation) at http://localhost:1300/Service.svc/GetData you can simply paste this into our SampleResponseBody.cs file by going to the Visual Studio Edit menu and selecting Paste XML to Types.  To get all the necessary types in one blow, you can also go to http://localhost:1300/Service.svc/Help and use Paste XML to Types.  As a third alternative, just copy the XML above and try Paste XML to Types in your SampleResponseBody class.  However you decide to do it, you are now in a position to translate XML into CLR types.

Your generated class should look like this:

[System.CodeDom.Compiler.GeneratedCodeAttribute(“System.Xml”, “2.0.50727.3053”)]

[System.Diagnostics.DebuggerStepThroughAttribute()]

[System.Xml.Serialization.XmlTypeAttribute(AnonymousType = true)]

[System.Xml.Serialization.XmlRootAttribute(Namespace = “”, IsNullable = false)]

public partial class SampleResponseBody

{


        private string valueField;


        /// <remarks/>

        public string Value

        {

            get

            {

                return this.valueField;

            }

            set

            {

                this.valueField = value;

            }

        }

}


5.  Next, we need to add the Starter Kit assemblies to our console application.  The default location for these assemblies is C:\Program Files\Microsoft WCF REST\WCF REST Starter Kit Preview 2\Assemblies .  The two assemblies we need for the client are Microsoft.Http.dll and Microsoft.Http.Extensions.dll .  (I happen to like to copy CodePlex bits like these into a folder in the My Documents\Visual Studio 2008 directory, to make it relatively easier to track drop versions).

6. We will now finally add some code to call call our GetData resource using the HttpClient class.  The following code will simply prompt the user to hit {Enter} to call the resource.  It will then return the deserialized message from the resource and prompt the user to hit {Enter} again.  Add the following using references to your Program.cs file:

using Microsoft.Http;

using System.Xml.Serialization;

  Now place the following code in the Main() method of Program.cs:

static void Main(string[] args)

{

    Console.WriteLine(“Press {enter} to call service:”);

    Console.ReadLine();


    var client = new HttpClient(http://localhost:1300/Service.svc/);

    HttpResponseMessage response = client.Get(“GetData”);


    var b = response.Content.ReadAsXmlSerializable<SampleResponseBody>();


    Console.WriteLine(b.Value);

    Console.ReadLine();

}

Both the Get request and the deserialization are simple.  We pass a base address for our service to the HttpClient constructor.  We then call the HttpClient’s Get method and pass the path to the resource we want (in true REST idiom, PUT, DELETE and POST are some additional methods on HttpClient).

The deserialization, in turn, only requires one line of code.  We call the Content property of the HttpResponseMessage instance returned by Get() to retrieve an HttpContent instance, then call its generic ReadAsXmlSerializable method to deserialize the XML message into our SampleResponseBody type.

While you could previously do this using WCF and deserialization, or even the HttpWebRequest and HttpWebResponse types and an XML parser, this is significantly easier.


console1


7. If you recall, the signature of the GetData service method actually takes two parameters, an integer and a string.  When translated into a REST resource, the parameters are passed in a query string.  To complete this example, we might want to go ahead and pass these parameters to our GetData resource.  To do so, replace the code above with the following:

static void Main(string[] args)

{

    Console.WriteLine(“Enter a number:”);

    int myInt;

    Int32.TryParse(Console.ReadLine(), out myInt);


    Console.WriteLine(“Enter a string:”);

    var myString = Console.ReadLine();


    var q = new HttpQueryString();

    q.Add(“param1”, myInt.ToString());

    q.Add(“param2”, myString);


    var client = new HttpClient(“http://localhost:1300/Service.svc/”);

    HttpResponseMessage response = client.Get(new Uri(client.BaseAddress + “GetData”), q);

    var b = response.Content.ReadAsXmlSerializable<SampleResponseBody>();


    Console.WriteLine(b.Value);

    Console.WriteLine(“Press {enter} to end.”);

    Console.ReadLine();

}

The first block asks for a number and we verify that a number was indeed submitted.  The next block requests a string.

The third block creates an HttpQueryString instance using our console inputs.

The important code is in the fourth block.  You will notice that we use a different overload for the Get method this time.  It turns out that the only overload that accepts a query string requires a Uri for its first parameter rather than a partial Uri string.  To keep things simple, I’ve simply concatenated “GetData” with the BaseAddress we previously passed in the constructor (this does not overwrite the BaseAddress, in case you were wondering).  We could have also simply performed a string concatenation like this, of course:

HttpResponseMessage response =

client.Get(string.Format(“GetData?param1={0}&param2={1}”,myInt.ToString(), myString));

but using the HttpQueryString type strikes me as being somewhat cleaner. 

If you run the console app now, it should look something like this:

console2


And that’s how we do RESTful WCF as of Friday, March 13th, 2009. 

To see how we used to do it prior to March 13th, please see this excellent blog post by Pedram Rezai from April of last year.


Interop Forms Toolkit 2.0 Tutorial

I originally wrote the prize-winning Interop Forms article below for code project.  The prize, an XBox 360 Elite system, was pretty sweet.  Even sweeter, however, was the nod I received from the Microsoft VB Team here: http://blogs.msdn.com/vbteam/archive/2007/06/01/so-what-does-lt-comclass-gt-actually-do.aspx and here: http://blogs.msdn.com/vbteam/archive/2007/06/04/interopforms-2-0-tip-1-font-property.aspx.

The feedback from the VB Team, along with some help from Mike Dooney, led me along the right path to rework my C# templates a bit (the toolkit comes with only VB.NET templates).  The differences between the VB and C# templates highlight the fact that although the two languages are often believed to do the same thing once code is compiled to IL, this is not really the case, and in fact, when it comes to COM, VB does a much better job.

To be specific, the VB compiler creates additional code in IL to make a VB class’s events and properties visible in VB6, while the C# compiler does not. I had written the original templates with the assumption that the two compilers would write similar IL — because of this faulty assumption, the events thrown in a C# UserControl were never received in VB6. This has been corrected in the updated C# templates by including in C# the extra attributes and interfaces required to make the events visible — interfaces which the VB compiler automatically creates for you in IL.

The C# templates linked below also automatically create these interfaces for you. When you add a new event to your UserControl, you will just need to be sure to add it to the appropriate interface, as well.  The naming convention for the interfaces (one for exposed events, one for exposed properties) is simply the name of the UserControl class preceded by two underscores and one underscore, respectively. It’s a little bit more manual labor than the VB templates require — but not too much more.

From the feedback I received at code project, it is apparent that while the toolkit is a big help to developers still maintaining VB6 applications, the big gain is for FoxPro developers (really a very solid development framework) who can now squeeze a little more out of their interfaces when they need to, thanks to the Toolkit.
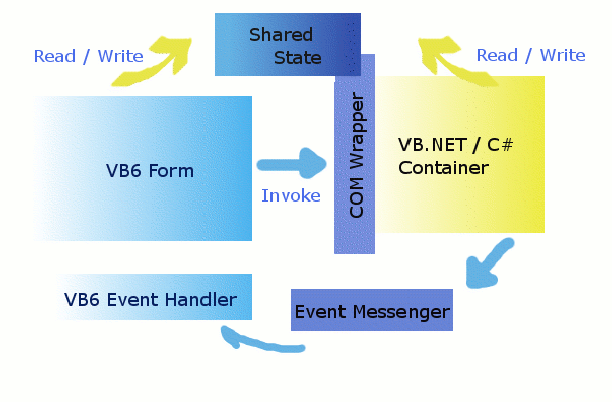
 

Diagram

Why use the Interop Toolkit?

A few years ago, the enterprise architects at the company I worked for came up with a central login mechanism for all the company’s applications using web services. They even provided code samples in Java, C# and VB.NET for using their new component. It was intended as a language agnostic solution. When we asked the architects what we should do with the VB6 applications that we were still supporting, the architects were nonplussed. They first provided some esoteric white papers on using SOAP with VB6, then they suggested that we upgrade all of our VB6 apps to .NET, and finally they conceded that VB6 apps simply didn’t have a place in their solution.

Had Interop Forms Toolkit 2.0 been available back then, we could have come up with an integration in under an hour. We would have simply copied the sample code into a new .NET User Control, used the Interop Toolkit to wrap it up as an ActiveX control, and then consumed the control in all of our VB6 apps.

Interop Toolkit 2.0 was just released at the beginning of May. The original Interop Toolkit already allowed VB developers to use .NET Forms in their applications. This is still in Toolkit 2.0, and appears not to have changed much.

What makes Toolkit 2.0 standout is its support for using .NET User Controls as ActiveX controls in VB6.
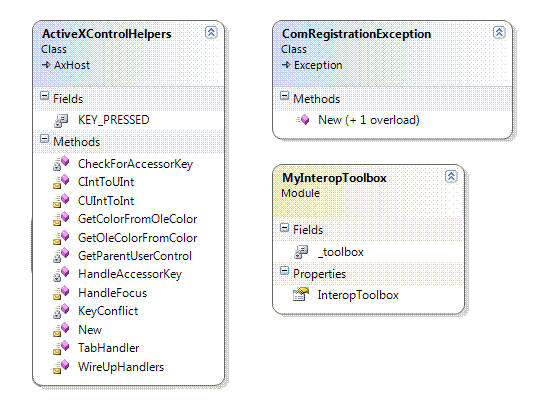
ActiveXControlHelpers

According to Microsoft, the toolkit is intended as part of a migration strategy for upgrading VB6 applications to .NET piece by piece. I am not sure this is how it is likely to be used, however, or even if it necessarily ought to be used in this way.

Toolkit 2.0 makes most sense as a tool that allows VB6 developers to take advantage of .NET features without being forced onto an upgrade path. Most VB6 applications that are still around obviously meet certain needs very well. Why fix something that isn’t broken?

There are times, however, when you may want to leverage .NET features in your VB6 application. For a long time your only two choices were to upgrade the whole application to .NET, or to forego the nifty new features.

Toolkit 2.0 provides a third option. Simply add the .NET feature you need as a control.

This tutorial will lead you through 1. a mock application that implements the sort of technology we would have used to solve the problem outlined above. It will also cover 2. installing the Interop Toolkit, 3. provide a reference app that gives developers the ability to use real multithreading in their VB6 apps, and finally 4. provide a how-to for integrating XAML files into VB6.

Interop for C# developers

Just as with the previous version, Interop Forms Toolkit 2.0 is geared towards VB.NET developers. The wizard, project templates and item templates that come with the Toolkit only come in VB flavors. This makes a certain amount of sense, since it will mostly be VB developers who will implement these .NET/VB6 integrations. Many developers like to work with both languages, however, and there may be integration scenarios where you need to expose pre-existing C# code to VB6.

For those cases, I’ve written the C# item template and C# project template linked above for Interop User Controls. Simply copy the project template zip file into your project templates folder (the default location is ...\My Documents\Visual Studio 2005\Templates\ProjectTemplates\Visual C#) and the item template zip file into your item templates folder (...\My Documents\Visual Studio 2005\Templates\ItemTemplates\Visual C#). I believe that these templates will only work with Visual Studio 2005, but I havn’t yet tested on older versions of Visual Studio to make sure.

For cases where you need to expose a C# Form, you can use the clever wizard and template written by Leon Langleyben, which I was able to get to work with a bit of tweaking — through no fault of Leon’s, since his add-in was written for the previous version of the Interop Toolkit (refer to the CSXamlEmbeddedForm project in the included CSharp Samples to see what the generated wrapper class should look like in C#).

Installing the Toolkit

Installing the toolkit is fairly straightforward. Navigate to the Toolkit Download Site and, of the three downloads available, run the InteropFormsInstaller.msi file. In most cases, this is all you need to do. When you open the Visual Studio.NET IDE, you should find the new templates, VB6 Interop UserControl and VB6 Interop Form Library, available when you create a new VB.NET project. Under your tools menu, you should also find a new wizard labeled “Generate InteropForm Wrapper Classes”.

If the new wizard does not appear in your tools menu, there may have been a problem installing it. Check Tools | Add-in Manager to make sure that this wizard is selected. If it is present and selected in the Add-in Manager, but still does not appear in your tools menu, you can run the following command in your command line to reset it: Devenv /resetaddin Microsoft.InteropFormTools.InteropFormProxyGenerator.Connect.

Installing the Toolkit on Vista

In order to use the Toolkit on Windows Vista, you will need to download both the msi file as well as the setup file to your harddrive. Then run setup. Running the msi file alone will generate an install error.

To use the C# UserControl templates on Vista, you will need to run Visual Studio as an Administrator. Right-click on the link to your Visual Studio IDE and select the Run as administrator popup menu option. This will let Vista’s UAC feature know that it is alright for the UserControl to write to the registry on build events.

Building a User Control

In this first example, the UserControl will take care of all the processing, and will just sit in the VB6 Form, while the example following it will demonstrate how to pass information between VB6 and VB.NET. Any code snippets will be in VB, though the source code samples linked above include both a VB.NET as well as a C# sample of the control.

In this example we use the Daily Dilbert web service to download a cartoon to our control (you will notice that the Daily Dilbert comes up a lot on CodeProject — for good reason; it happens to be one of the few interesting web services that can actually be used in public tutorials, since it does not require a fee or registration).
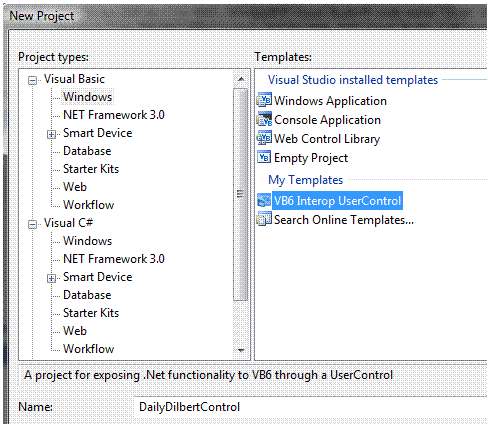
Open new project

Begin by creating a new VB6 Interop User Control project using the VB6 Interop UserControl project template. Name the project DailyDilbertControl. By default, a UserControl file is created called InteropUserControl.vb. Since this is the control name that will be displayed in your VB6 control panel, you should rename it to DilbertService.vb, to be more descriptive.

In your new project, you will find the following files: ActiveXControlHelpers.vb, InteropUserControl.bmp, InteropUserControl.manifest. ActiveXControlHelpers.vb, as the name suggests, includes several static helper methods that make the conversion of your UserControl into an ActiveX control possible. There are register and unregister methods, which add details about your control to the registry. There are methods that help convert things like color codes between the .NET scheme and the OLE scheme used in VB6. There is also a method that wires up your events to work with VB6. You can have multiple user controls in your project, but should only have one ActiveXControlHelpers file per project.

The InteropUserControl.bmp is used to display your control in the VB6 Toolbox. I will cover how to customize your ActiveX control image later in this tutorial.

Add a new web reference to the Daily Dilbert web service to your project. To do this, right click on your project and select Add Web Reference… A new dialog will pop up. Enter http://www.esynaps.com/WebServices/DailyDiblert.asmx for the URL and click on Go. Finally, rename the web reference to “DDService” and select Add Reference at the lower right of the dialog. Your Solution Explorer should now look like this.
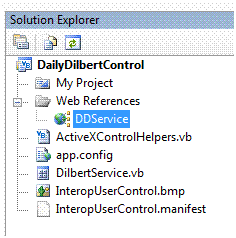
AddWebReference 

Add a 650 by 215 pixel PictureBox called DilbertPictureBox to your UserControl, as well as a button called RetrieveButton. Create a new RetrieveButton_Click event handler by double clicking on RetrieveButton. Paste in the following code, which will call the web service and retrieve today’s Dilbert strip.

    Private Sub RetrieveButton_Click(ByVal sender As System.Object, _
        ByVal e As System.EventArgs) Handles RetrieveButton.Click
        Dim myDilbert As New DDService.DailyDilbert()
        Dim DilbertMemoryStream As _
        New System.IO.MemoryStream(myDilbert.DailyDilbertImage())
        With Me.DilbertPictureBox
            .Image = Image.FromStream(DilbertMemoryStream)
            .BorderStyle = BorderStyle.Fixed3D
        End With
    End Sub

To finish making your control visible from VB6, just press F5 to preview the control, or simply build it. It will look like this in your Visual Studio UserControl Test Container:
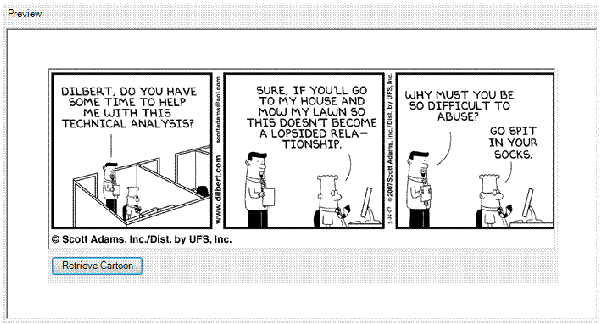
DilbertControlPreview 

And that’s all it takes to build build an ActiveX control in Visual Studio.NET.

Adding an ActiveX Control Image

When you build a new control, InteropUserControl.bmp will be used as the default image for your component in the VB6 Toolbar. You can always use a different image, though. For this project, I want to use this image of Dilbert.

Dilbert

To add it, you first have to add the bitmap file you want to use to your project and set its build property to “content”. Now open the InteropUserControl.rc resource script file with notepad. DO NOT use Visual Studio to do this, as this will mess up your resource script file. InteropUserControl.rc can be found under the DailyDilbertControl project folder. Beneath the default 101 BITMAP InteropUserControl.bmp entry, add an additional entry specifying the custom bitmap you want to use.
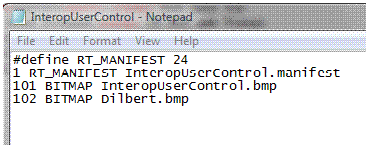
changeresourcescript 

Save your resource script file. Now open ActiveXHelpers.vb and find the RegisterControl method. This is where registry entries are created. In the section where the bitmap file is specified, replace the default entry, “101”, with a reference to your own bitmap.

replacebitmap

Now rebuild your control to make sure a new compiled resource file is created. The new image should appear in the VB6 Toolbox rather than the default image.

vb6toolbar

More about adding ActiveX Control Images

You can use a different image for each UserControl in your project, but you will have to modify the ActiveXControlHelpers.vb file a bit to make this work. Alter the RegisterControl method signature to take a second string parameter, and then pass this parameter to the line where the code specifies the resource id of the image.

    Public Sub RegisterControl(ByVal t As Type, ByVal BitmapId As String)

    '...
    
    'ToolBoxBitmap32
    Using bitmapKey As RegistryKey = subkey.CreateSubKey("ToolBoxBitmap32")
    bitmapKey.SetValue("", Assembly.GetExecutingAssembly.Location & ", "  _
    & BitmapId, RegistryValueKind.String)
    End Using
    
    '...
    
    End Sub

Then, in each UserControl, add the BitmapId you want to use for your control to the RegisterControl call.

    <EditorBrowsable(EditorBrowsableState.Never)> _
    <ComRegisterFunction()> _
    Private Shared Sub Register(ByVal t As Type)
        ComRegistration.RegisterControl(t, "102")
    End Sub

Rebuild the entire project once more.

Adding the UserControl to a VB6 project
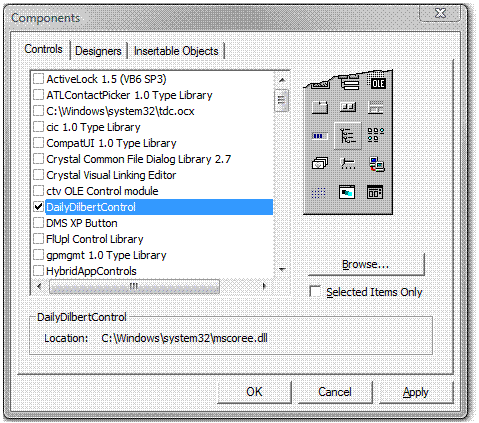
DailyDilbertComponent 

This is actually the easiest part. Create a new VB6 project. Press CTRL+T to add a new component to your form, and check the DailyDilbertControl library. Press OK. (Vista behaves a bit strangely when you try to add your ActiveX control. It will occassionally throw an error the first time you select OK, then will work normally the second time you do so. Just to be safe, click Apply first just to see if there is an error, and then OK.) Any UserControls in your project will now appear on the VB Toolbar. Simply select the control you want to use and draw it onto your VB6 form. Press F5 to see your .NET UserControl run in a Visual Basic 6 application.
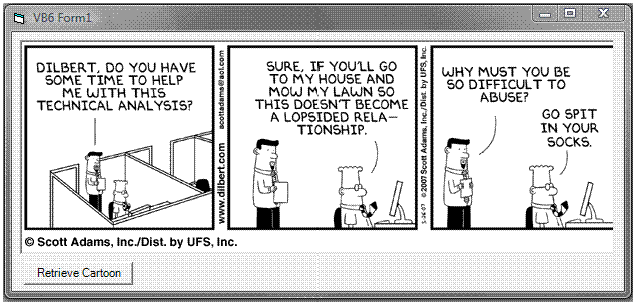
vb6form1 

Adding True Multithreading to VB6

When I was working with VB6 on a regular basis, one of the main impetuses for upgrading to .NET was the ability to implement multithreading. Interop UserControls provide an easy way to add true multithreading to a VB6 application. In a common scenario, you may want the users of your VB app to be able to kick off a process and then continue with their work while the processing occurs in the background. To simulate this scenario, the reference code we are about to build will use a BackgroundWorker control that will perform a time-consuming process in the background while updating a progress bar. In the meantime, the users of the VB6 application that consumes the control can continue with their work.

Create a new VB6 Interop UserControl project called MultithreadedControl. Add a BackgroundWorker control named BackgroundWorker1, a label called LabelWarningMessage and ProgressBar called ProgressBar1. Paste in the following code.

    Public Delegate Sub StartEventHandler(ByVal simpleEventText As String)
    Public Delegate Sub FinishAsyncEventHandler(ByVal asyncEventText As String)

    Public Event StartEvent As StartEventHandler
    Public Event FinishAsyncEvent As FinishAsyncEventHandler

    Public Sub StartProcessing()
        Try
            RaiseEvent StartEvent(".NET process starting")
            Me.BackgroundWorker1.RunWorkerAsync()
        Catch
        End Try
    End Sub

    Private Sub BackgroundWorker1_DoWork(ByVal sender As System.Object, _
    ByVal e As System.ComponentModel.DoWorkEventArgs) _
    Handles BackgroundWorker1.DoWork
        'wait
        Static prog As Integer = 0
        While (prog < 100)
            System.Threading.Thread.Sleep(50)
            prog = prog + 2
            Me.BackgroundWorker1.ReportProgress(prog)
        End While
        prog = 0
    End Sub

    Private Sub BackgroundWorker1_ProgressChanged(ByVal sender As System.Object, _
    ByVal e As System.ComponentModel.ProgressChangedEventArgs) _
    Handles BackgroundWorker1.ProgressChanged
        Me.LabelWarningMessage.ForegroundColor = Color.Red
        Me.LabelWarningMessage.Text = "Working in background..."
        Me.LabelWarningMessage.Visible = True
        Me.ProgressBar1.Value = e.ProgressPercentage
    End Sub

    Private Sub BackgroundWorker1_RunWorkerCompleted(ByVal sender As System.Object, _
    ByVal e As System.ComponentModel.RunWorkerCompletedEventArgs) _
    Handles BackgroundWorker1.RunWorkerCompleted
        Me.LabelWarningMessage.Visible = False
        RaiseEvent FinishAsyncEvent("Interop User Control process finished.")
    End Sub
    
    Private Sub BackgroundWorker_Load(ByVal sender As System.Object, _
    ByVal e As System.EventArgs) Handles MyBase.Load
        Me.ProgressBar1.Value = 0
        Me.LabelWarningMessage.Visible = False
    End Sub

Finally, make sure that the BackgroundWorker events are hooked up to the handlers we’ve written.

backgroundworkerevents 

Also make certain that the BackgroundWorker’s WorkerReportsProgress property is set to true. Build the project.

Open a new VB6 project and add the MultithreadedControl component to your VB6 Form, as you did in the previous example. Also add a multiline TextBox control (Text1), a ListBox (List1), and a CommandButton labeled “Process” (Command1).

In order to receive events from the BackgroundWorker control, you will need to add an additional reference to the control. Click on the menu item Project | References… A reference to MultithreadedControlCtrl will already be checked off from previously adding it as a component. You will now need to also include a reference to the library MultithreadedControl in order to capture events thrown from the .NET Control.
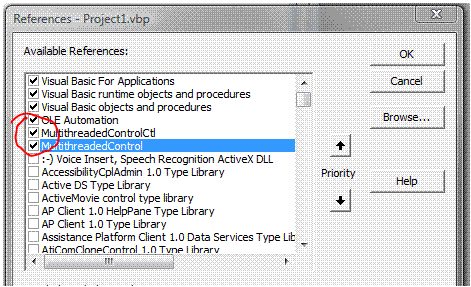
MultithreadedControlReference 

Finally, paste in the following VB6 code. In this code, you declare a new reference to the control, this time decorated with the keyword “WithEvents” in order to expose the control’s events. Wiring up handlers for the events is based only on the names of the procedures, so you have to be careful when typing out the Sub routines that will be used in this way.

Before the underscore, always use the same name you used when you created the second reference (in this case “BackgroundEvents”). Then after the underscore, use the actual event name as it appears in your original .NET control. I’ve seen lots of problems posted to various message boards concerning problems with VB Interop event handling that basically came down to misspelling a handler’s signature — so be careful.

Dim WithEvents BackgroundEvents As MultithreadedControl.BackgroundWorker

Private Sub Command1_Click()
    Me.Text1.Text = ""
    Me.List1.Clear
    Me.List1.AddItem ("Start processing from VB6: " & DateTime.Now)
    Me.BackgroundWorker1.StartProcessing
End Sub

Private Sub Form_Load()
    Set BackgroundEvents = Me.BackgroundWorker1
End Sub

Private Sub BackgroundEvents_StartEvent(ByVal EventText As String)
    Me.List1.AddItem (EventText)
End Sub

Private Sub BackgroundEvents_FinishAsyncEvent(ByVal EventText As String)
    Me.List1.AddItem (EventText)
    Me.List1.AddItem ("Finish processing from VB6:" & DateTime.Now)
End Sub

This reference app basically demonstrates how a .NET BackgroundWorker can be used inside a VB6 application. Even while the processing is occurring, and updating the status bar to let us know how far it has gotten, the end-user can continue typing into the textbox. If you have never programmed in VB6, then this probably seems like a trivial accomplishment.

For those of us who have worked on Visual Basic 6 apps for large portions of our careers, it is a breakthrough.
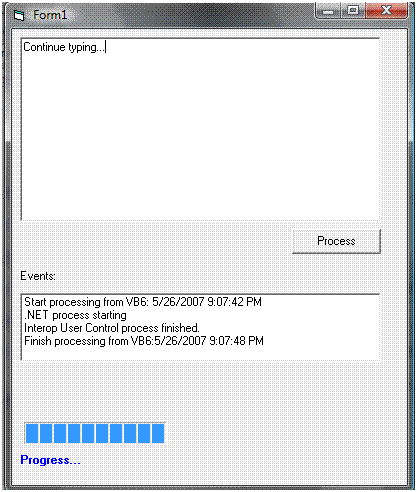
VB6Multithreaded

Using XAML in VB6

You cannot build a XAML UserControl or a XAML Form and then consume it directly in VB6, unfortunately. You also cannot simply add a XAML Form to a Windows Application project and expose it that way. With a bit of finesse, what you can do is embed a XAML UserControl in a Windows Form and consume that in your VB6 apps. The following walkthrough will show you how.

Create a new VB6 InteropForm Library Project in Visual Studio, and call it XamlEmbeddedForm. Rename the default Windows Form to XamlForm. Now add a second project based on the .NET Framework 3.0 Custom Control Library (WPF) project template and call it XamlUserControl. You can add whatever XAML code you like, at this point. For the reference project, I’ve used the Cube Animation code found in the WPF SDK. Build the XamlUserControl project. In XamlEmbeddedForm, add a reference to the UserControl project. Also add the following four library references: PresentationCore, PresentationFramework, WindowsBase and WindowsFormsIntegration.
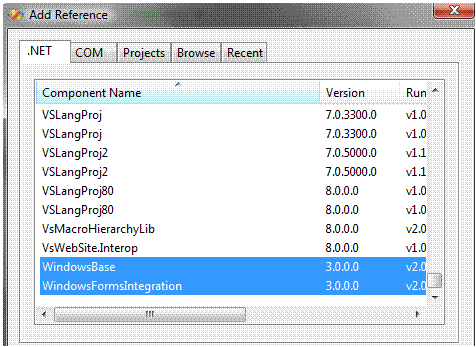
NewReferences 

You now will need to add some code to the FormLoad event in order to host the XAML UserControl in your .NET Form. The complete code behind should look like this:

Imports Microsoft.InteropFormTools
Imports System.Windows.Forms.Integration
Imports System.ComponentModel
Imports System.Windows.Forms

<InteropForm()> _
Public Class XamlForm

    Private Sub XamlForm_Load(ByVal sender As System.Object, _
        ByVal e As System.EventArgs) _
        Handles MyBase.Load
        ' Create the ElementHost control for hosting the
        ' WPF UserControl.
        Dim host As New ElementHost()
        host.Dock = DockStyle.Fill

        ' Create the WPF UserControl.
        Dim uc As New XamlUserControl.UserControl1()

        ' Assign the WPF UserControl to the ElementHost
        '  control's Child property.
        host.Child = uc

        ' Add the ElementHost control to the form's
        ' collection of child controls.
        Me.Controls.Add(host)
    End Sub
End Class

Rebuild your solution one more time for good measure. Then go to the Tools menu and select Generate InteropForm Wrapper Classes (if this menu option is missing, refer to the installation instructions above). This will add a new wrapper class to your project that can be exposed to VB6. Rebuild one last time to register your wrapper class in the registry. At this point, your .NET code is complete.

Open a new project in VB6. Open Project | References and check two items to add them to your VB6 project: Microsoft Interop Forms Toolkit Library as well as your .NET project, XAMLEmbeddedForm to add to COM wrapper for your .NET assembly to your VB6 project.

.NET Interop Forms have difficulty knowing when the host VB6 application starts and stops, so some extra code must be added to your VB6 application to handle this. Add the following code snippet to your VB6 Main Form so the .NET code is informed when these events occur.

Public g_InteropToolbox As InteropToolbox

Private Sub Form_Load()
    Set g_InteropToolbox = New InteropToolbox
    g_InteropToolbox.Initialize
    g_InteropToolbox.EventMessenger.RaiseApplicationStartedupEvent
End Sub

Private Sub Form_QueryUnload(Cancel As Integer, UnloadMode As Integer)
    g_InteropToolbox.EventMessenger.RaiseApplicationShutdownEvent
End Sub

We are nearly done. To open your .NET Form from VB6, just add a command button to your Main Form and handle its click event with the following code.

Private Sub Command1_Click()
Dim xaml As New XamlEmbeddedForm.XamlForm
    xaml.Show vbModal
End Sub

If everything goes right, when you click the button, you should see an animated cube, written all in XAML.
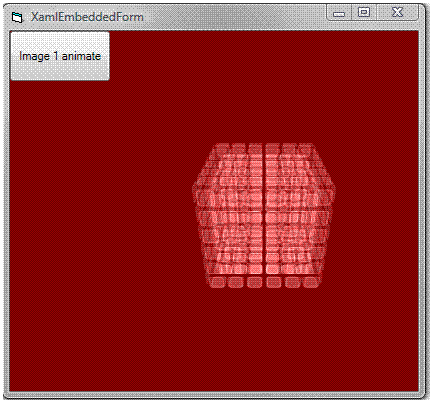
EmbeddedForm

Conclusion

This tutorial is intended to walk you through the steps needed to create a useful .NET/VB6 integration. It is also intended to give you a sense of the almost limitless possibilities that are open to VB6 developers now that this technology has been made widely available. Half a decade after people were foretelling the doom of VB6 as a development tool, we should come to terms with the idea that VB6 will still be with us for quite a while longer. Interop Toolkit 2.0 ensures that the many years left to VB6 development will be both graceful and productive.

Speech Recognition And Synthesis Managed APIs in Windows Vista: Part III

Voice command technology, as exemplified in Part II, is probably the most useful and most easy to implement aspect of the Speech Recognition functionality provided by Vista.  In a few days of work, any current application can be enabled to use it, and the potential for streamlining workflow and making it more efficient is truly breathtaking.  The cool factor, of course, is also very high.

Having grown up watching Star Trek reruns, however, I can’t help but feel that the dictation functionality is much more interesting than the voice command functionality.  Computers are meant to be talked to and told what to do, as in that venerable TV series, not cajoled into doing tricks for us based on finger motions over a typewriter.  My long-term goal is to be able to code by talking into my IDE in order to build UML diagrams and then, at a word, turn that into an application.  What a brave new world that will be.  Toward that end, the SR managed API provides the DictationGrammar class.

Whereas the Grammar class works as a gatekeeper, restricting the phrases that get through to the speech recognized handler down to a select set of rules, the DictateGrammar class, by default, kicks out the jams and lets all phrases through to the recognized handler.

In order to make Speechpad a dictation application, we will add the default DicatateGrammar object to the list of grammars used by our speech recognition engine.  We will also add a toggle menu item to turn dictation on and off.  Finally, we will alter the SpeechToAction() method in order to insert any phrases that are not voice commands into the current Speechpad document as text.  Create an local instance of DictateGrammar for our Main form, and then instantiate it in the Main constructor.  Your code should look like this:

	#region Local Members
		
        private SpeechSynthesizer synthesizer = null;
        private string selectedVoice = string.Empty;
        private SpeechRecognitionEngine recognizer = null;
        private DictationGrammar dictationGrammar = null;
        
        #endregion
        
        public Main()
        {
            InitializeComponent();
            synthesizer = new SpeechSynthesizer();
            LoadSelectVoiceMenu();
            recognizer = new SpeechRecognitionEngine();
            InitializeSpeechRecognitionEngine();
            dictationGrammar = new DictationGrammar();
        }
        

Create a new menu item under the Speech menu and label it “Take Dictation“.  Name it takeDictationMenuItem for convenience. Add a handler for the click event of the new menu item, and stub out TurnDictationOn() and TurnDictationOff() methods.  TurnDictationOn() works by loading the local dictationGrammar object into the speech recognition engine. It also needs to turn speech recognition on if it is currently off, since dictation will not work if the speech recognition engine is disabled. TurnDictationOff() simply removes the local dictationGrammar object from the speech recognition engine’s list of grammars.

		
        private void takeDictationMenuItem_Click(object sender, EventArgs e)
        {
            if (this.takeDictationMenuItem.Checked)
            {
                TurnDictationOff();
            }
            else
            {
                TurnDictationOn();
            }
        }

        private void TurnDictationOn()
        {
            if (!speechRecognitionMenuItem.Checked)
            {
                TurnSpeechRecognitionOn();
            }
            recognizer.LoadGrammar(dictationGrammar);
            takeDictationMenuItem.Checked = true;
        }

        private void TurnDictationOff()
        {
            if (dictationGrammar != null)
            {
                recognizer.UnloadGrammar(dictationGrammar);
            }
            takeDictationMenuItem.Checked = false;
        }
        

For an extra touch of elegance, alter the TurnSpeechRecognitionOff() method by adding a line of code to turndictation off when speech recognition is disabled:

        TurnDictationOff();

Finally, we need to update the SpeechToAction() method so it will insert any text that is not a voice command into the current Speechpad document.  Use the default statement of the switch control block to call the InsertText() method of the current document.

        
        private void SpeechToAction(string text)
        {
            TextDocument document = ActiveMdiChild as TextDocument;
            if (document != null)
            {
                DetermineText(text);
                switch (text)
                {
                    case "cut":
                        document.Cut();
                        break;
                    case "copy":
                        document.Copy();
                        break;
                    case "paste":
                        document.Paste();
                        break;
                    case "delete":
                        document.Delete();
                        break;
                    default:
                        document.InsertText(text);
                        break;
                }
            }
        }


With that, we complete the speech recognition functionality for Speechpad. Now try it out. Open a new Speechpad document and type “Hello World.”  Turn on speech recognition.  Select “Hello” and say delete.  Turn on dictation.  Say brave new.

This tutorial has demonstrated the essential code required to use speech synthesis, voice commands, and dictation in your .Net 2.0 Vista applications.  It can serve as the basis for building speech recognition tools that take advantage of default as well as custom grammar rules to build adanced application interfaces.  Besides the strange compatibility issues between Vista and Visual Studio, at the moment the greatest hurdle to using the Vista managed speech recognition API is the remarkable dearth of documentation and samples.  This tutorial is intended to help alleviate that problem by providing a hands on introduction to this fascinating technology.

Speech Recognition And Synthesis Managed APIs In Windows Vista: Part II


Playing with the speech synthesizer is a lot of fun for about five minutes (ten if you have both Microsoft Anna and Microsoft Lila to work with)  — but after typing “Hello World” into your Speechpad document for the umpteenth time, you may want to do something a bit more challenging.  If you do, then it is time to plug in your expensive microphone, since speech recognition really works best with a good expensive microphone.  If you don’t have one, however, then go ahead and plug in a cheap microphone.  My cheap microphone seems to work fine.  If you don’t have a cheap microphone, either, I have heard that you can take a speaker and plug it into the mic jack of your computer, and if that doesn’t cause an explosion, you can try talking into it.


While speech synthesis may be useful for certain specialized applications, voice commands, by cantrast, are a feature that can be used to enrich any current WinForms application. With the SR Managed API, it is also easy to implement once you understand certain concepts such as the Grammar class and the SpeechRecognitionEngine.


We will begin by declaring a local instance of the speech engine and initializing it. 

	#region Local Members

private SpeechSynthesizer synthesizer = null;
private string selectedVoice = string.Empty;
private SpeechRecognitionEngine recognizer = null;

#endregion

public Main()
{
InitializeComponent();
synthesizer = new SpeechSynthesizer();
LoadSelectVoiceMenu();
recognizer = new SpeechRecognitionEngine();
InitializeSpeechRecognitionEngine();
}

private void InitializeSpeechRecognitionEngine()
{
recognizer.SetInputToDefaultAudioDevice();
Grammar customGrammar = CreateCustomGrammar();
recognizer.UnloadAllGrammars();
recognizer.LoadGrammar(customGrammar);
recognizer.SpeechRecognized +=
new EventHandler<SpeechRecognizedEventArgs>(recognizer_SpeechRecognized);
recognizer.SpeechHypothesized +=
new EventHandler<SpeechHypothesizedEventArgs>(recognizer_SpeechHypothesized);
}

private Grammar CreateCustomGrammar()
{
GrammarBuilder grammarBuilder = new GrammarBuilder();
grammarBuilder.Append(new Choices(“cut”, “copy”, “paste”, “delete”));
return new Grammar(grammarBuilder);
}


The speech recognition engine is the main workhorse of the speech recognition functionality.  At one end, we configure the input device that the engine will listen on.  In this case, we use the default device (whatever you have plugged in), though we can also select other inputs, such as specific wave files.  At the other end, we capture two events thrown by our speech recognition engine.  As the engine attempts to interpret the incoming sound stream, it will throw various “hypotheses” about what it thinks is the correct rendering of the speech input.  When it finally determines the correct value, and matches it to a value in the associated grammar objects, it throws a speech recognized event, rather than a speech hypothesized event.  If the determined word or phrase does not have a match in any associated grammar, a speech recognition rejected event (which we do not use in the present project) will be thrown instead.


In between, we set up rules to determine which words and phrases will throw a speech recognized event by configuring a Grammar object and associating it with our instance of the speech recognition engine.  In the sample code above, we configure a very simple rule which states that a speech recognized event will be thrown if any of the following words: “cut“, “copy“, “paste“, and “delete“, is uttered.  Note that we use a GrammarBuilder class to construct our custom grammar, and that the syntax of the GrammarBuilder class closely resembles the syntax of the StringBuilder class.


This is the basic code for enabling voice commands for a WinForms application.  We will now enhance the Speechpad application by adding a menu item to turn speech recognition on and off,  a status bar so we can watch as the speech recognition engine interprets our words, and a function that will determine what action to take if one of our key words is captured by the engine.


Add a new menu item labeled “Speech Recognition” under the “Speech” menu item, below “Read Selected Text” and “Read Document”.  For convenience, name it speechRecognitionMenuItem.  Add a handler to the new menu item, and use the following code to turn speech recognition on and off, as well as toggle the speech recognition menu item.  Besides the RecognizeAsync() method that we use here, it is also possible to start the engine synchronously or, by passing it a RecognizeMode.Single parameter, cause the engine to stop after the first phrase it recognizes. The method we use to stop the engine, RecognizeAsyncStop(), is basically a polite way to stop the engine, since it will wait for the engine to finish any phrases it is currently processing before quitting. An impolite method, RecognizeAsyncCancel(), is also available — to be used in emergency situations, perhaps.

        private void speechRecognitionMenuItem_Click(object sender, EventArgs e)
{
if (this.speechRecognitionMenuItem.Checked)
{
TurnSpeechRecognitionOff();
}
else
{
TurnSpeechRecognitionOn();
}
}

private void TurnSpeechRecognitionOn()
{
recognizer.RecognizeAsync(RecognizeMode.Multiple);
this.speechRecognitionMenuItem.Checked = true;
}

private void TurnSpeechRecognitionOff()
{
if (recognizer != null)
{
recognizer.RecognizeAsyncStop();
this.speechRecognitionMenuItem.Checked = false;
}
}


We are actually going to use the RecognizeAsyncCancel() method now, since there is an emergency situation. The speech synthesizer, it turns out, cannot operate if the speech recognizer is still running. To get around this, we will need to disable the speech recognizer at the last possible moment, and then reactivate it once the synthesizer has completed its tasks. We will modify the ReadAloud() method to handle this.


private void ReadAloud(string speakText)
{
try
{
SetVoice();
recognizer.RecognizeAsyncCancel();
synthesizer.Speak(speakText);
recognizer.RecognizeAsync(RecognizeMode.Multiple);
}
catch (Exception ex)
{
MessageBox.Show(ex.Message);
}

}

The user now has the ability to turn speech recognition on and off. We can make the application more interesting by capturing the speech hypothesize event and displaying the results to a status bar on the Main form.  Add a StatusStrip control to the Main form, and a ToolStripStatusLabel to the StatusStrip with its Spring property set to true.  For convenience, call this label toolStripStatusLabel1.  Use the following code to handle the speech hypothesized event and display the results:

private void recognizer_SpeechHypothesized(object sender, SpeechHypothesizedEventArgs e)
{
GuessText(e.Result.Text);
}

private void GuessText(string guess)
{
toolStripStatusLabel1.Text = guess;
this.toolStripStatusLabel1.ForeColor = Color.DarkSalmon;
}


Now that we can turn speech recognition on and off, as well as capture misinterpretations of the input stream, it is time to capture the speech recognized event and do something with it.  The SpeechToAction() method will evaluate the recognized text and then call the appropriate method in the child form (these methods are accessible because we scoped them internal in the Textpad code above).  In addition, we display the recognized text in the status bar, just as we did with hypothesized text, but in a different color in order to distinguish the two events.


private void recognizer_SpeechRecognized(object sender, SpeechRecognizedEventArgs e)
{
string text = e.Result.Text;
SpeechToAction(text);
}

private void SpeechToAction(string text)
{
TextDocument document = ActiveMdiChild as TextDocument;
if (document != null)
{
DetermineText(text);

switch (text)
{
case “cut”:
document.Cut();
break;
case “copy”:
document.Copy();
break;
case “paste”:
document.Paste();
break;
case “delete”:
document.Delete();
break;
}
}
}

private void DetermineText(string text)
{
this.toolStripStatusLabel1.Text = text;
this.toolStripStatusLabel1.ForeColor = Color.SteelBlue;
}


Now let’s take Speechpad for a spin.  Fire up the application and, if it compiles, create a new document.  Type “Hello world.”  So far, so good.  Turn on speech recognition by selecting the Speech Recognition item under the Speech menu.  Highlight “Hello” and say the following phrase into your expensive microphone, inexpensive microphone, or speaker: delete.  Now type “Save the cheerleader, save the”.  Not bad at all.

Speech Recognition And Synthesis Managed APIs In Windows Vista: Part I


VistaSpeechAPIDemo.zip – 45.7 Kb


VistaSpeechAPISource.zip – 405 Kb


Introduction


One of the coolest features to be introduced with Windows Vista is the new built in speech recognition facility.  To be fair, it has been there in previous versions of Windows, but not in the useful form in which it is now available.  Best of all, Microsoft provides a managed API with which developers can start digging into this rich technology.  For a fuller explanation of the underlying technology, I highly recommend the Microsoft whitepaper. This tutorial will walk the user through building a common text pad application, which we will then trick out with a speech synthesizer and a speech recognizer using the .Net managed API wrapper for SAPI 5.3. By the end of this tutorial, you will have a working application that reads your text back to you, obeys your voice commands, and takes dictation. But first, a word of caution: this code will only work for Visual Studio 2005 installed on Windows Vista. It does not work on XP, even with .NET 3.0 installed.

Background


Because Windows Vista has only recently been released, there are, as of this writing, several extant problems relating to developing on the platform.  The biggest hurdle is that there are known compatibility problems between Visual Studio and Vista.  Visual Studio.NET 2003 is not supported on Vista, and there are currently no plans to resolve any compatibility issues there.  Visual Studio 2005 is supported,  but in order to get it working well, you will need to make sure you also install service pack 1 for Visual Studio 2005.  After this, you will also need to install a beta update for Vista called, somewhat confusingly, “Visual Studio 2005 Service Pack 1 Update for Windows Vista Beta”.  Even after doing all this, you will find that all the new cool assemblies that come with Vista, such as the System.Speech assembly, still do not show up in your Add References dialog in Visual Studio.  If you want to have them show up, you will finally need to add a registry entry indicating where the Vista dll’s are to be found.  Open the Vista registry UI by running regedit.exe in your Vista search bar.  Add the following registry key HKEY_LOCAL_MACHINE\SOFTWARE\Microsoft\.NETFramework\AssemblyFolders\v3.0 Assemblies with this value: C:\\Program Files\\Reference Assemblies\\Microsoft\\Framework\\v3.0. (You can also install it under HKEY_CURRENT_USER, if you prefer.)  Now, we are ready to start programming in Windows Vista.

Before working with the speech recognition and synthesis functionality, we need to prepare the ground with a decent text pad application to which we will add on our cool new toys. Since this does not involve Vista, you do not really have to follow through this step in order to learn the speech recognition API.  If you already have a good base application, you can skip ahead to the next section, Speechpad, and use the code there to trick out your app.  If you do not have a suitable application at hand, but also have no interest in walking through the construction of a text pad application, you can just unzip the source code linked above and pull out the included Textpad project.  The source code contains two Visual Studio 2005 projects, the Textpad project, which is the base application for the SR functionality, and Speechpad, which includes the final code.


All the same, for those with the time to do so, I feel there is much to gain from building an application from the ground up. The best way to learn a new technology is to use it oneself and to get one’s hands dirty, as it were, since knowledge is always more than simply knowing that something is possible; it also involves knowing how to put that knowledge to work. We know by doing, or as Giambattista Vico put it, verum et factum convertuntur.


Textpad


Textpad is an MDI application containing two forms: a container, called Main.cs, and a child form, called TextDocument.csTextDocument.cs, in turn, contains a RichTextBox control.


Create a new project called Textpad.  Add the “Main” and “TextDocument” forms to your project.  Set the IsMdiContainer property of Main to true.  Add a MainMenu control and an OpenFileDialog control (name it “openFileDialog1”) to Main.  Set the Filter property of the OpenFileDialog to “Text Files | *.txt”, since we will only be working with text files in this project.  Add a RichTextBox control to “TextDocument”, name it “richTextBox1”; set its Dock property to “Fill” and its Modifiers property to “Internal”.


Add a MenuItem control to MainMenu called “File” by clicking on the MainMenu control in Designer mode and typing “File” where the control prompts you to “type here”.  Set the File item’s MergeType property to “MergeItems”. Add a second MenuItem called “Window“.  Under the “File” menu item, add three more Items: “New“, “Open“, and “Exit“.  Set the MergeOrder property of the “Exit” control to 2.  When we start building the “TextDocument” form, these merge properties will allow us to insert menu items from child forms between “Open” and “Exit”.


Set the MDIList property of the Window menu item to true.  This automatically allows it to keep track of your various child documents during runtime.


Next, we need some operations that will be triggered off by our menu commands.  The NewMDIChild() function will create a new instance of the Document object that is also a child of the Main container.  OpenFile() uses the OpenFileDialog control to retrieve the path to a text file selected by the user.  OpenFile() uses a StreamReader to extract the text of the file (make sure you add a using declaration for System.IO at the top of your form). It then calls an overloaded version of NewMDIChild() that takes the file name and displays it as the current document name, and then injects the text from the source file into the RichTextBox control in the current Document object.  The Exit() method closes our Main form.  Add handlers for the File menu items (by double clicking on them) and then have each handler call the appropriate operation: NewMDIChild(), OpenFile(), or Exit().  That takes care of your Main form.

        #region Main File Operations

private void NewMDIChild()
{
NewMDIChild(“Untitled”);
}

private void NewMDIChild(string filename)
{
TextDocument newMDIChild = new TextDocument();
newMDIChild.MdiParent = this;
newMDIChild.Text = filename;
newMDIChild.WindowState = FormWindowState.Maximized;
newMDIChild.Show();
}

private void OpenFile()
{
try
{
openFileDialog1.FileName = “”;
DialogResult dr = openFileDialog1.ShowDialog();
if (dr == DialogResult.Cancel)
{
return;
}
string fileName = openFileDialog1.FileName;
using (StreamReader sr = new StreamReader(fileName))
{
string text = sr.ReadToEnd();
NewMDIChild(fileName, text);
}
}
catch (Exception ex)
{
MessageBox.Show(ex.Message);
}
}

private void NewMDIChild(string filename, string text)
{
NewMDIChild(filename);
LoadTextToActiveDocument(text);
}

private void LoadTextToActiveDocument(string text)
{
TextDocument doc = (TextDocument)ActiveMdiChild;
doc.richTextBox1.Text = text;
}

private void Exit()
{
Dispose();
}

#endregion


To the TextDocument form, add a SaveFileDialog control, a MainMenu control, and a ContextMenuStrip control (set the ContextMenuStrip property of richTextBox1 to this new ContextMenuStrip).  Set the SaveFileDialog’s defaultExt property to “txt” and its Filter property to “Text File | *.txt”.  Add “Cut”, “Copy”, “Paste”, and “Delete” items to your ContextMenuStrip.  Add a “File” menu item to your MainMenu, and then “Save“, Save As“, and “Close” menu items to the “File” menu item.  Set the MergeType for “File” to “MergeItems”. Set the MergeType properties of “Save”, “Save As” and “Close” to “Add”, and their MergeOrder properties to 1.  This creates a nice effect in which the File menu of the child MDI form merges with the parent File menu.


The following methods will be called by the handlers for each of these menu items: Save(), SaveAs(), CloseDocument(), Cut(), Copy(), Paste(), Delete(), and InsertText(). Please note that the last five methods are scoped as internal, so they can be called by the parent form. This will be particularly important as we move on to the Speechpad project.


#region Document File Operations

private void SaveAs(string fileName)
{
try
{
saveFileDialog1.FileName = fileName;
DialogResult dr = saveFileDialog1.ShowDialog();
if (dr == DialogResult.Cancel)
{
return;
}
string saveFileName = saveFileDialog1.FileName;
Save(saveFileName);
}
catch (Exception ex)
{
MessageBox.Show(ex.Message);
}
}

private void SaveAs()
{
string fileName = this.Text;
SaveAs(fileName);
}

internal void Save()
{
string fileName = this.Text;
Save(fileName);
}

private void Save(string fileName)
{
string text = this.richTextBox1.Text;
Save(fileName, text);
}

private void Save(string fileName, string text)
{
try
{
using (StreamWriter sw = new StreamWriter(fileName, false))
{
sw.Write(text);
sw.Flush();
}
}
catch (Exception ex)
{
MessageBox.Show(ex.Message);
}
}

private void CloseDocument()
{
Dispose();
}

internal void Paste()
{
try
{
IDataObject data = Clipboard.GetDataObject();
if (data.GetDataPresent(DataFormats.Text))
{
InsertText(data.GetData(DataFormats.Text).ToString());
}
}
catch (Exception ex)
{
MessageBox.Show(ex.Message);
}
}

internal void InsertText(string text)
{
RichTextBox theBox = richTextBox1;
theBox.SelectedText = text;
}

internal void Copy()
{
try
{
RichTextBox theBox = richTextBox1;
Clipboard.Clear();
Clipboard.SetDataObject(theBox.SelectedText);
}
catch (Exception ex)
{
MessageBox.Show(ex.Message);
}
}

internal void Cut()
{
Copy();
Delete();
}

internal void Delete()
{
richTextBox1.SelectedText = string.Empty;
}

#endregion


Once you hook up your menu item event handlers to the methods listed above, you should have a rather nice text pad application. With our base prepared, we are now in a position to start building some SR features.


Speechpad


Add a reference to the System.Speech assembly to your project.  You should be able to find it in C:\Program Files\Reference Assemblies\Microsoft\Framework\v3.0\.  Add using declarations for System.Speech, System.Speech.Recognition, and System.Speech.Synthesis to your Main form. The top of your Main.cs file should now look something like this:

using System;
using System.Collections.Generic;
using System.ComponentModel;
using System.Data;
using System.Drawing;
using System.Text;
using System.Windows.Forms;
using System.IO;
using System.Speech;
using System.Speech.Synthesis;
using System.Speech.Recognition;

In design view, add two new menu item to the main menu in your Main form labeled “Select Voice” and “Speech“.  For easy reference, name the first item selectVoiceMenuItem.  We will use the “Select Voice” menu to programmatically list the synthetic voices that are available for reading Speechpad documents.  To programmatically list out all the synthetic voices, use the following three methods found in the code sample below.  LoadSelectVoiceMenu() loops through all voices that are installed on the operating system and creates a new menu item for each.  VoiceMenuItem_Click() is simply a handler that passes the click event on to the SelectVoice() method. SelectVoice() handles the toggling of the voices we have added to the “Select Voice” menu.  Whenever a voice is selected, all others are deselected.  If all voices are deselected, then we default to the first one.


Now that we have gotten this far, I should mention that all this trouble is a little silly if there is only one synthetic voice available, as there is when you first install Vista. Her name is Microsoft Anna, by the way. If you have Vista Ultimate or Vista Enterprise, you can use the Vista Updater to download an additional voice, named Microsoft Lila, which is contained in the Simple Chinese MUI.  She has a bit of an accent, but I am coming to find it rather charming.  If you don’t have one of the high-end flavors of Vista, however, you might consider leaving the voice selection code out of your project.


private void LoadSelectVoiceMenu()
{
foreach (InstalledVoice voice in synthesizer.GetInstalledVoices())
{
MenuItem voiceMenuItem = new MenuItem(voice.VoiceInfo.Name);
voiceMenuItem.RadioCheck = true;
voiceMenuItem.Click += new EventHandler(voiceMenuItem_Click);
this.selectVoiceMenuItem.MenuItems.Add(voiceMenuItem);
}
if (this.selectVoiceMenuItem.MenuItems.Count > 0)
{
this.selectVoiceMenuItem.MenuItems[0].Checked = true;
selectedVoice = this.selectVoiceMenuItem.MenuItems[0].Text;
}
}

private void voiceMenuItem_Click(object sender, EventArgs e)
{
SelectVoice(sender);
}

private void SelectVoice(object sender)
{
MenuItem mi = sender as MenuItem;
if (mi != null)
{
//toggle checked value
mi.Checked = !mi.Checked;

if (mi.Checked)
{
//set selectedVoice variable
selectedVoice = mi.Text;
//clear all other checked items
foreach (MenuItem voiceMi in this.selectVoiceMenuItem.MenuItems)
{
if (!voiceMi.Equals(mi))
{
voiceMi.Checked = false;
}
}
}
else
{
//if deselecting, make first value checked,
//so there is always a default value
this.selectVoiceMenuItem.MenuItems[0].Checked = true;
}
}
}


We have not declared the selectedVoice class level variable yet (your Intellisense may have complained about it), so the next step is to do just that.  While we are at it, we will also declare a private instance of the System.Speech.Synthesis.SpeechSynthesizer class and initialize it, along with a call to the LoadSelectVoiceMenu() method from above, in your constructor:


#region Local Members

private SpeechSynthesizer synthesizer = null;
private string selectedVoice = string.Empty;

#endregion

public Main()
{
InitializeComponent();
synthesizer = new SpeechSynthesizer();
LoadSelectVoiceMenu();
}


To allow the user to utilize the speech synthesizer, we will add two new menu items under the “Speech” menu labeled “Read Selected Text” and “Read Document“.  In truth, there isn’t really much to using the Vista speech synthesizer.  All we do is pass a text string to our local SpeechSynthesizer object and let the operating system do the rest.  Hook up event handlers for the click events of these two menu items to the following methods and you will be up and running with an SR enabled application:


#region Speech Synthesizer Commands

private void ReadSelectedText()
{
TextDocument doc = ActiveMdiChild as TextDocument;
if (doc != null)
{
RichTextBox textBox = doc.richTextBox1;
if (textBox != null)
{
string speakText = textBox.SelectedText;
ReadAloud(speakText);
}
}
}

private void ReadDocument()
{
TextDocument doc = ActiveMdiChild as TextDocument;
if (doc != null)
{
RichTextBox textBox = doc.richTextBox1;
if (textBox != null)
{
string speakText = textBox.Text;
ReadAloud(speakText);
}
}
}

private void ReadAloud(string speakText)
{
try
{
SetVoice();
synthesizer.Speak(speakText);
}
catch (Exception ex)
{
MessageBox.Show(ex.Message);
}

}

private void SetVoice()
{
try
{
synthesizer.SelectVoice(selectedVoice);
}
catch (Exception)
{
MessageBox.Show(selectedVoice + “\” is not available.);
}
}

#endregion

Converting to ASP.NET Ajax Beta 2 (A Guide for the Perplexed)


There are a few good guides already on the internet that provide an overview of what is required to convert your Atlas CTP projects to Ajax Extensions.  This guide will probably not add anything new, but will hopefully consolidate some of the advice already provided, as well as offer a few pointers alluded to by others but not explained.  In other words, this is the guide I wish I had before I began my own conversion project.


1. The first step is to download install the Ajax Extensions beta 2 and the Ajax Futures (value added-) November CTP.  One problem I have heard of occurred when an associate somehow failed to remove his beta 1 dlls, and had various mysterious errors due to using the wrong version. 


2. Create a new Ajax Extensions project. This should provide you with the correct library references and the correct web configuration file.  Here are the minimum configuration settings needed for an ASP.Net Ajax website to work:


</configuration>


     <system.web>
     <pages>
     <controls>
            <add tagPrefix=”asp” namespace=”Microsoft.Web.UI” assembly=”Microsoft.Web.Extensions, Version=1.0.61025.0, Culture=neutral, PublicKeyToken=31bf3856ad364e35″/>
           <add tagPrefix=”asp” namespace=”Microsoft.Web.UI.Controls” assembly=”Microsoft.Web.Extensions, Version=1.0.61025.0, Culture=neutral, PublicKeyToken=31bf3856ad364e35″/>
           <add tagPrefix=”asp” namespace=”Microsoft.Web.Preview.UI” assembly=”Microsoft.Web.Preview”/>
     </controls>


     <compilation debug=”true”>
          <assemblies>
                <add assembly=”Microsoft.Web.Extensions, Version=1.0.61025.0, Culture=neutral, PublicKeyToken=31BF3856AD364E35″/>
          </assemblies>
     </compilation>

</configuration>


You also need to make sure that you have a reference to the Microsoft.Web.Extensions dll as well as to the Microsoft.Web.Preview dll, if you intend to use features such as drag and drop or glitz. Both of these dlls should be registered in the GAC, although it wasn’t for me.  To make sure it was available in the GAC, I had to add a new registry key HKEY_LOCAL_MACHINE\SOFTWARE\Microsoft\.NETFramework\AssemblyFolders\ASP.NET AJAX 1.0.61025  with a default value indicating the location of the ASP.Net Ajax dlls: c:\Program Files\Microsoft ASP.NET\ASP.NET 2.0 AJAX Extensions\v1.0.61025″


On a side note, there seems to currently be some ambiguity over whether the Microsoft.Web.Extensions dll can or cannot simply be placed in your bin folder rather than placed in the GAC.  It seems to work, even though the official documentation says it should not.


3. Wherever you used to use the shortcut “$” as a shorthand for “document.getElementsById“, you will now need to use “$get” .  I usually need to go through my Atlas code three or four times before I catch every intance of this and make the appropriate replacement.


4. Sys.Application.findControl(“myControl”) is now simplified to $find(“myControl”).


5. Wherever you used to use this.control.element, you now will use this.get_element().


6. The “atlas:” namespace has been replaced with the “asp:” namespace, so go through your code and make the appropriate replacements.  For example,


<atlas:ScriptManager ID=”ScriptManager1″ runat=”server”/>


is now


<asp:ScriptManager ID=”ScriptManager1″ runat=”server”/>


7. Script References have changed.  The ScriptName attribute is now just the Name attribute.  The files that used to make up the optional ajax scripts are now broken out differently, and so if you need to use the dragdrop script file or the glitz script file, you now will also need to include PreviewScript javascript file.  This:


<atlas:ScriptManager ID=”ScriptManager1″ runat=”server”>
     <Scripts>
          <atlas:ScriptReference ScriptName=”AtlasUIDragDrop” />
          <atlas:ScriptReference Path=”scriptLibrary/DropZoneBehavior.js” />
     </Scripts>
</atlas:ScriptManager>


is now this:


<asp:ScriptManager ID=”ScriptManager1″ runat=”server”>
     <Scripts>
          <asp:ScriptReference Assembly=”Microsoft.Web.Preview” Name=”Microsoft.Web.Resources.ScriptLibrary.PreviewScript.js” />
          <asp:ScriptReference Assembly=”Microsoft.Web.Preview” Name=”Microsoft.Web.Resources.ScriptLibrary.PreviewDragDrop.js” />
          <asp:ScriptReference Path=”scriptLibrary/DropZoneBehavior.js” />
     </Scripts>
</asp:ScriptManager>


8. Namespaces have changed, and you may need to hunt around to find your classes.  For instance, Sys.UI.IDragSource is now Sys.Preview.UI.IDragSource, and for the most part you can probably get away with replacing all your Sys.UI namespaces with Sys.Preview.UI.  On the other hand, Sys.UI.Behavior has stayed where it is, so this is not always going to be the case.  The method setLoctation has also shifted namespaces.  It used to be found in Sys.UI.  It is now in Sys.UI.DomElement.


9. Xml Scripting change: Xml scripting, which allows you to use javascript in a declarative manner, is now part of the Value Added CTP.  As I understand it, the Value Added CTP, also known as Ajax Futures, includes lots of stuff originally included in the Atlas CTP but deemed to be of lower priority than the core Ajax Extensions features.  In order to meet a tough deadline, these have been set aside for now.  The Ajax Toolkit, in turn, is heavily dependent on these value added features, since the toolkit components tend to leverage the common javascript libraries such as Glitz much more than the specifically Ajax features provided with the core release.  The syntax for adding custom behaviors using Xml Scripting has changed, while the syntax for built in behaviors is the same.  An Xml Scripting region used to look like this:


<script type=”text/xml-script”>
   <page xmlns:script=”http://schemas.microsoft.com/xml-script/2005″>
      <components>
         <control id=”dropZone”>
           <behaviors>
               <DropZoneBehavior/>
           </behaviors>
         </control>
         <control id=”draggableDiv”>
           <behaviors>
             <floatingBehavior handle=”handleBar” />
           </behaviors>
         </control>
      </components>


Now it looks like this:


<script type=”text/xml-script”>
   <page xmlns:script=”http://schemas.microsoft.com/xml-script/2005″
xmlns:fooNamespace=”Custom.UI”>
      <components>
        <control id=”dropZone”>
          <behaviors>
            <fooNamespace:DropZoneBehavior/>
          </behaviors>
        </control>
      <control id=”draggableDiv”>
         <behaviors>
              <floatingBehavior handle=”handleBar” />
         </behaviors>
      </control>
    </components>
  </page>
</script>


Note: The AspNet AJAX CTP to Beta Whitepaper has a slightly different syntax, but this appears to be a typo, and the one I have provided above is the correct grammar.


10.  Adding behaviors using javascript has changed.  The biggest thing is that you no longer explicitly have to convert a DOM object to an ASP.Net Ajax object, as this is now done beneath the covers.  The get_behaviors().add(…) method has also been retired.  For my particular conversion, this code:


function addFloatingBehavior(ctrl, ctrlHandle){
     var floatingBehavior = new Sys.UI.FloatingBehavior();
     floatingBehavior.set_handle(ctrlHandle);
     var dragItem = new Sys.UI.Control(ctrl);
     dragItem.get_behaviors().add(floatingBehavior);
     floatingBehavior.initialize();
     }


got shortened to this:


function addFloatingBehavior(ctrl, ctrlHandle){
     var floatingBehavior = new Sys.Preview.UI.FloatingBehavior(ctrl);
     floatingBehavior.set_handle(ctrlHandle);
     floatingBehavior.initialize();
     }


This can in turn be shortened even further with the $create super function: 


function addFloatingBehavior(ctrl, ctrlHandle){


   $create(Sys.Preview.UI.FloatingBehavior, {‘handle’: ctrlHandle}, null, null, ctrl);


}


11.  Closures and Prototypes:


You ought to convert javascript classes written as closures to classes written as prototypes.  Basically, instead of having private members, properties and methods all in the same place (called, it turns out, “closures”), they are now separated out into an initial definition that includes the members, and then a definition of the prototype that includes the various methods and properties, which are in turn rewritten using a slightly different grammar.  Here is a reasonably good overview of what the prototype object is used for.  Bertand LeRoy‘s two posts on closures and prototypes is also a good resource.


12. You basically follow the following steps to mechanically rewrite a closure as a prototype. First, change all your private variable declarations into public member declarations.  For instance, the following declaration:


var i = 0;


should now be:


this.i = 0;


Consolidate all of your members at the top and then place a close bracket after them to close your class definition.


13.  Start the first line of code to define your prototype.  For instance, in my dropzonebehavior class, I replaced this:


 Custom.UI.DropZoneBehavior = function() {
     Custom.UI.DropZoneBehavior.initializeBase(this);
     initialize: function(){
          Custom.UI.DropZoneBehavior.callBaseMethod(this, ‘initialize’);
          // Register ourselves as a drop target.
          Sys.Preview.UI.DragDropManager.registerDropTarget(this);
          }


}


with this:


Custom.UI.DropZoneBehavior = function() {
       Custom.UI.DropZoneBehavior.initializeBase(this);
}


Custom.UI.DropZoneBehavior.prototype = {
     initialize: function(){
             Custom.UI.DropZoneBehavior.callBaseMethod(this, ‘initialize’);
            // Register ourselves as a drop target.
            Sys.Preview.UI.DragDropManager.registerDropTarget(this); 
            }


}


simply by adding these two lines:


}


Custom.UI.DropZoneBehavior.prototype = {


14. Throughout the rest of the prototype definition, refer to your variables as members by adding


this.

in front of all of them.


15. Interfaces have changed.  The bahavior class, which did not used to take a parameter, now does:


Custom.UI.FloatingBehavior = function(value) {
    Custom.UI.FloatingBehavior.initializeBase(this,[value]);

}


16. Properties and methods are written differently in the prototype definition than they were in closures.  Wherever you have a method or property, you should rewrite it by getting rid of the preceding “this.” and replacing the equals sign in your method definition with a colon.  Finally, a comma must be inserted after each method or property definition except the last.  For example, this:


this.initialize = function() {
    Custom.UI.FloatingBehavior.callBaseMethod(this, ‘initialize’);

}


becomes this:


initialize: function() {
     Custom.UI.FloatingBehavior.callBaseMethod(this, ‘initialize’);

},


17. Type descriptors are gone.  This means you no longer need the getDescriptor method or the Sys.TypeDescriptor.addType call to register your Type Descriptor.  There is an alternate grammar for writing type descriptors using JSON, but my code worked fine without it.  I think it is meant for writing extenders.


18. Hooking up event handlers to DOM events has been simplified.  You used to need to define a delegate for the DOM event, and then use the attachEvent and detachEvent methods to link the delegate with your handler function.  In the beta 2, all of this is encapsulated and you will only need two super functions, $addHandler and $removeHandler.  You should probably place your $addHandler method to your initialize method, and $removeHandler to your dispose method.  The syntax for $addHandler will typically look like this:


$addHandler(this.get_element(), ‘mousedown’, YourMouseDownHandlerFunction)

$removeHandler takes the same parameters.  One thing worth noting is that, whereas the reference to the DOM event used to use the IE specific event name, in this case ‘onmousedown’, the designers of ASP.Net Ajax have now opted to use the naming convention adopted by Firefox and Safari. 


19. The last touch: add the following lines as the last bit of code in your script file:


if(typeof(Sys) !== “undefined”)
Sys.Application.notifyScriptLoaded();


You basically just need to do this.  It may even be one of the rare instances in programming where you don’t even need to know why you are doing it since, as far as I know, you will never encounter a situation where you won’t put it in your script.  My vague understanding of the reason, though, is that the ASP.Net Ajax page lifecycle needs to know when scripts are loaded; both IE and Firefox throw events when a page has completed loading.  Safari, however, does not.  notifyScriptLoaded() provides a common way to let all browsers know when scripts have been loaded and it is safe to work with the included classes and functions.


Bibliography (of sorts):


Here are the good guides I referred to at the top of this post: Bertrand LeRoy‘s post on javascript prototypes, Eilon Lipton‘s blog, the comments here: Scott Guthrie, Sean Burke‘s migration guide, Miljan Braticevic‘s experience with upgrading the Component Art tools.  The most comprehensive guide to using Ajax Extensions beta 2 is actually the upgrade guide provided by Microsoft Ajax Team here: AspNet AJAX CTP to Beta Whitepaper. I used the official online documentation, http://ajax.asp.net/docs/Default.aspx, mainly to figure out which namespaces to use and where the various functions I needed had been moved to.  Finally, using the search functionality on the ASP.Net Ajax forums helped me get over many minor difficulties.

V. ASP.NET Ajax Imperative Dropzones


To create dropzones using JavaScript instead of declarative script, just add the following JavaScript function to initialize your dropzone element with the custom dropzone behavior:


function addDropZoneBehavior(ctrl){

$create(Custom.UI.DropZoneBehavior, {}, null, null, ctrl);
}


To finish hooking everything up, call this addDropZoneBehavior function from the ASP.NET Ajax pageLoad() method, as you did in earlier examples for the addFloatingBehavior function.  This will attach the proper behaviors to their respective html elements and replicate the drag and dropzone functionality you created above using declarative markup.  If you want to make this work dynamically, just add the createDraggableDiv() function you already wrote for the previous dynamic example.  As a point of reference, here is the complete code for creating programmatic dropzones:


<%@ Page Language=”C#” %>
<!DOCTYPE html PUBLIC “-//W3C//DTD XHTML 1.0 Transitional//EN” “http://www.w3.org/TR/xhtml1/DTD/xhtml1-transitional.dtd”>
<html xmlns=”http://www.w3.org/1999/xhtml” >
<head id=”Head1″ runat=”server”>
<title>Imperative Drop Targets</title>
<script type=”text/javascript”>
    function addFloatingBehavior(ctrl, ctrlHandle){
        $create(Sys.Preview.UI.FloatingBehavior, {‘handle’: ctrlHandle}, null, null, ctrl);
    }
    function addDropZoneBehavior(ctrl){
        $create(Custom.UI.DropZoneBehavior, {}, null, null, ctrl);
    }
    function pageLoad(){
        addDropZoneBehavior($get(‘dropZone’));
        addFloatingBehavior($get(‘draggableDiv’),$get(‘handleBar’));
    }
</script>
</head>
<body>
<form id=”form1″ runat=”server”>
<asp:ScriptManager ID=”ScriptManager1″ runat=”server”>
    <Scripts>
            <asp:ScriptReference Name=”Microsoft.Web.Resources.ScriptLibrary.PreviewScript” />
        <asp:ScriptReference Name=”Microsoft.Web.Resources.ScriptLibrary.PreviewDragDrop” />
        <asp:ScriptReference Path=”scriptLibrary/DropZoneBehavior.js” />
    </Scripts>
</asp:ScriptManager>
<h2>Imperative Drop Targets with javacript</h2>
<div style=”background-color:Red;height:200px;width:200px;”>
    <div id=”draggableDiv” style=”height:100px;width:100px;background-color:Blue;”>
        <div id=”handleBar” style=”height:20px;width:auto;background-color:Green;”>
        </div>
    </div>
</div>
<div id=”dropZone” style=”background-color:cornflowerblue;height:200px;width:200px;”>Drop Zone</div>
</form>
</body>
</html>


Conclusion


Besides the dropzone behavior, you may want to also write your own floating behavior. For instance, by default, elements decorated with the floating behavior simply stay where you drop them. You may want to extend this so that your floating div will snap back to its original location when you drop it outside of a drop zone. Additionally, you may want to change the way the dragged element looks while you are dragging it, either by making it transparent, changing its color, or replacing the drag image altogether. All this can be accomplished by creating a behavior that implements the IDragSource interface in the same way you created a custom class that implements the IDropTarget interface.


This tutorial is for the most part a straight translation of the original Atlas tutorial that I wrote against the April CTP.  Even though many of the concepts behind Atlas are still retained in Ajax Extensions, some have changed by a turning of the screw so that what was once fitting and accurate in the original tutorial is no longer quite so.  For instance, whereas in the original Atlas tutorial I could talk about Xml Scripting and the rest of the ASP.NET Ajax functionality as one technology, they are now currently two varying technologies with different levels of support and interest for Microsoft.  There are more subtle differences that, I think, make the current version of the tutorial somewhat dated, as if I am saying everthing with a slight accent; in other words, while I stand by the accuracy of this tutorial, I think it has lost some of its original elegance in the translation.  I believe the tutorial will still be useful for those trying to get started with Microsoft’s Ajax implementation, though it’s chief utility, at this point, will probably be for people who were used to the Atlas way of doing things and need a point of reference to see how the semantics of the technology has changed. I hope the samples will help you over some of your growing pains, as writing it has helped me with mine.

IV. ASP.NET Ajax Declarative Dropzones


Being able to drag html elements around a page and have them stay where you leave them is visually interesting. To make this behavior truly useful, though, an event should be thrown when the drop occurs.  Furthermore, the event that is thrown should depend on where the drop occurs.  In other words, there needs to be behavior that can be added to a given html element that will turn it into a “dropzone” or a “drop target”,  the same way that the floating behavior can be added to an html div tag to turn it into a drag and drop element.

In the following examples, I will show how Atlas supports the concept of dropzones.  In its current state, Atlas does not support an out-of-the-box behavior for creating dropzone elements in quite the same way it does for floating elements.  It does, however, implement behaviors for a dragdroplist element and a draggablelistitem element which, when used together, allow you to create lists that can be reordered by dragging and dropping.  If you would like to explore this functionality some more, there are several good examples of using the dragDropList behavior on the web, for instance, Introduction to Drag And Drop with Atlas.

The main disadvantage of the dragdropzone behavior is that it only works with items that have been decorated with the DragDropList behavior. The functionality that this puts at your disposal is fairly specific. To get the sort of open-ended dropzone functionality I described above, that will also work with the predefined floating behavior, you will need to write your own dropzone behavior class in JavaScript. Fortunately, this is not all that hard.


Atlas adds several OOP extensions to JavaScript in order to make it more powerful, extensions such as namespaces, abstract classes, and interfaces. You will take advantage of these in coding up your own dropzone behavior. If you peer behind the curtain and look at the source code in the PreviewDragDrop.js file, (contained in the directory C:\Program Files\Microsoft ASP.NET\ASP.NET 2.0 AJAX Extensions\v1.0.61025\ScriptLibrary\Debug), you will find several interfaces defined there, including one for Sys.UI.DragSource and one for Sys.UI.DropTarget. In fact, both the FloatingBehavior class and the DraggableListItem class implement the Sys.UI.DragSource interface, while Sys.UI.DropTarget is implemented by the DragDropList class. The code for these two interfaces looks like this:


Sys.Preview.UI.IDragSource = function Sys$Preview$UI$IDragSource() {
}


Sys.Preview.UI.IDragSource.prototype = {
      get_dragDataType: Sys$Preview$UI$IDragSource$get_dragDataType,
      getDragData: Sys$Preview$UI$IDragSource$getDragData,
      get_dragMode: Sys$Preview$UI$IDragSource$get_dragMode,
      onDragStart: Sys$Preview$UI$IDragSource$onDragStart,
      onDrag: Sys$Preview$UI$IDragSource$onDrag,
      onDragEnd: Sys$Preview$UI$IDragSource$onDragEnd
}
Sys.Preview.UI.IDragSource.registerInterface(‘Sys.Preview.UI.IDragSource’);

Sys.Preview.UI.IDropTarget = function Sys$Preview$UI$IDropTarget() {
}


Sys.Preview.UI.IDropTarget.prototype = {
     get_dropTargetElement: Sys$Preview$UI$IDropTarget$get_dropTargetElement,
     canDrop: Sys$Preview$UI$IDropTarget$canDrop,
     drop: Sys$Preview$UI$IDropTarget$drop,
     onDragEnterTarget: Sys$Preview$UI$IDropTarget$onDragEnterTarget,
     onDragLeaveTarget: Sys$Preview$UI$IDropTarget$onDragLeaveTarget,
     onDragInTarget: Sys$Preview$UI$IDropTarget$onDragInTarget
}
Sys.Preview.UI.IDropTarget.registerInterface(‘Sys.Preview.UI.IDropTarget’);


Why do you need to implement these interfaces instead of simply writing out brand new classes to support drag, drop, and dropzones? The secret is that, behind the scenes, a third class, called the DragDropManager, is actually coordinating the interactions between the draggable elements and the dropzone elements, and it only knows how to work with classes that implement the IDragSource or the IDropTarget. The DragDropManager class registers which dropzones are legitimate targets for each draggable element, handles the MouseOver events to determine when a dropzone has a draggable element over it, and a hundred other things you do not want to do yourself. In fact, it does it so well that the dropzone behavior you are about to write is pretty minimal. First, create a new JavaScript file called DropZoneBehavior.js. I placed my JavaScript file under a subdirectory called scriptLibrary, but this is not necessary in order to make the dropzone behavior work. Next, copy the following code into your file:


Type.registerNamespace(‘Custom.UI’);
Custom.UI.DropZoneBehavior = function(value) {
 Custom.UI.DropZoneBehavior.initializeBase(this, [value]);


}


Custom.UI.DropZoneBehavior.prototype = {
    initialize:  function() {
        Custom.UI.DropZoneBehavior.callBaseMethod(this, ‘initialize’);
        // Register ourselves as a drop target.
        Sys.Preview.UI.DragDropManager.registerDropTarget(this);
        },
    dispose: function() {
        Custom.UI.DropZoneBehavior.callBaseMethod(this, ‘dispose’);
        },
    getDescriptor: function() {
        var td = Custom.UI.DropZoneBehavior.callBaseMethod(this, ‘getDescriptor’);
        return td;
        },
    // IDropTarget members.
    get_dropTargetElement: function() {
        return this.get_element();
        },
    drop: function(dragMode, type, data) {
        alert(‘dropped’);
        },
    canDrop: function(dragMode, dataType) {
        return true;
        },
    onDragEnterTarget: function(dragMode, type, data) {
        },
    onDragLeaveTarget: function(dragMode, type, data) {
        },
    onDragInTarget: function(dragMode, type, data) {
        }
}
Custom.UI.DropZoneBehavior.registerClass(‘Custom.UI.DropZoneBehavior’, Sys.UI.Behavior, Sys.Preview.UI.IDragSource, Sys.Preview.UI.IDropTarget, Sys.IDisposable);
if(typeof(Sys) != “undefined”) {Sys.Application.notifyScriptLoaded();}


I need to explain this class a bit backwards.  The first thing worth noticing is the second to last line that begins “Custom.UI.DropZoneBehavior.registerClass.”  This is where the dropZoneBehaviorClass defined above gets registered with Ajax Extensions.  The first parameter of the registerClass method takes the name of the class.  The second parameter takes the base class.  The remaining parameters take the interfaces that are implemented by the new class.  The line following this throws a custom event indicating that the script has completed loading (this is needed in order to support Safari, which does not do this natively).  Now back to the top, the “Type.registerNamespace” method allows you to register your custom namespace.  The next line declares our new class using an anonymous method syntax.  This is a way of writing JavaScript that I am not particularly familiar with, but is very important for making JavaScript object oriented, and is essential for designing Atlas behaviors.  Within the anonymous method, the class methods initialize, dispose, and getDescriptor are simply standard methods used for all behavior classes, and in this implementation, all you need to do is call the base method (that is, the method of the base class that you specify in the second to last line of this code sample.)  The only thing special you do is to register the drop target with the Sys.Preview.UI.DragDropManager in the initialize method.  This is the act that makes much of the drag drop magic happen.

Next, you implement the IDropTarget methods.  In this example, you are only implementing two methods, “this.canDrop” and “this.drop”.  For “canDrop”, you are just going to return true.  More interesting logic can be placed here to determine which floating div tags can actually be dropped on a given target, and even to determine what sorts of floating divs will do what when they are dropped, but in this case you only want a bare-bones implementation of  IDropTarget that will allow any floating div to be dropped on it.   Your implementation of the “drop” method is similarly bare bones.  When a floating element is dropped on one of your drop targets, an alert message will be thrown indicating that something has occurred.  And that’s about it.  You now have a drop behavior that works with the floating behavior we used in the previous examples.

You should now write up a page to show off your new custom dropzone behavior.  You can build on the previous samples to accomplish this.  In the Script Manager, besides registering the PreviewDragDrop script, you will also want to register your new DropZoneBehavior script:


<asp:ScriptManager ID=”ScriptManager1″ runat=”server”>
    <Scripts>
        <asp:ScriptReference Name=”Microsoft.Web.Resources.ScriptLibrary.PreviewScript” />
        <asp:ScriptReference Name=”Microsoft.Web.Resources.ScriptLibrary.PreviewDragDrop” />
        <asp:ScriptReference Path=”scriptLibrary/DropZoneBehavior.js” />
    </Scripts>
</asp:ScriptManager>


Next, you will want to add a new div tag to the HTML body, that can be used as a drop target:


<div style=”background-color:Red;height:200px;width:200px;”>
    <div id=”draggableDiv” style=”height:100px;width:100px;background-color:Blue;”>
        <div id=”handleBar” style=”height:20px;width:auto;background-color:Green;”>
        </div>
    </div>
</div>
<div id=”dropZone” style=”background-color:cornflowerblue;height:200px;width:200px;”>
    Drop Zone
</div>


Finally, you need to add a declarative markup element to add your custom DropZone behavior to the div you plan to use as a dropzone element. The XML markup should look like this:


<script type=”text/xml-script”>
    <page xmlns:script=”http://schemas.microsoft.com/xml-script/2005″ xmlns:JavaScript=”Custom.UI”>
<components>
<control id=”dropZone”>
                <behaviors>
                    <JavaScript:DropZoneBehavior/>
                </behaviors>
            </control>
<control id=”draggableDiv”>
                <behaviors>
                    <floatingBehavior handle=”handleBar”/>
                </behaviors>
            </control>
        </components>
    </page>
</script>


The code you have just written should basically add a drop zone to the original declarative drag and drop example.  When you drop your drag element on the drop zone, an alert message should now appear.  You can expand on this code to make the drop method of your custom dropzone behavior do much more interesting things, such as firing off other javascript events in the current page or even calling a webservice, using ASP.NET Ajax, that will in turn process server-side code for you.